Configuring Azure VMSS with Cloud-Init: A Step-by-Step Guide
- Introduction
- Creating the Resource Group
- Creating the Cloud-Init Configuration
- Creating the VMSS, Load Balancer, and Using the Cloud-Init Configuration
- Configuring Incoming Rules to Allow HTTP Traffic
- Navigating to the Website
- Best Practices
- Summary
TL;DR
Techplus Corporation is a fictional company that sells computer parts and electronics. Their website experienced an increase in traffic that their current setup was unable to handle. The company has decided to use Virtual Machine Scale Sets (VMSS) to host the website, and will be using cloud-init configuration to automate the configuration of each VMSS instance. This tutorial will cover several Azure concepts, including resource groups, virtual networks and subnets, network security groups, VMSS, and Azure Load Balancers. It will also outline the organization of the components needed for this process, including the configuration file, modules, and various tasks that can be automated with cloud-init.
Introduction
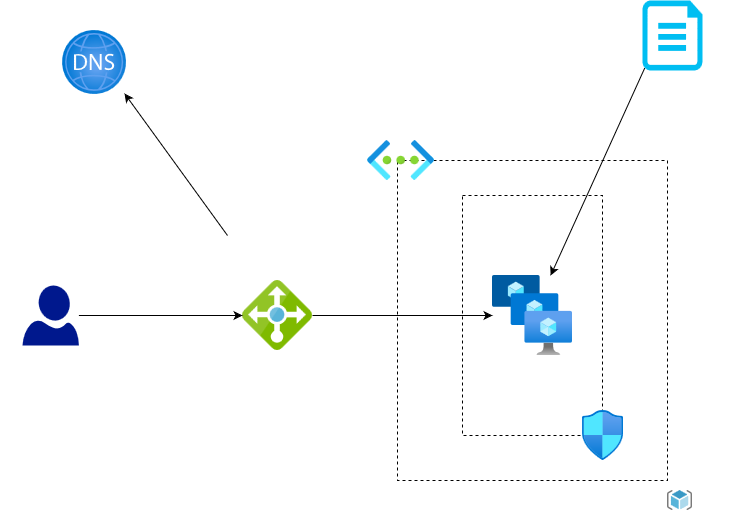
• Virtual network and subnets: A virtual network is a logical representation of a network in Azure, and a subnet is a range of IP addresses within a virtual network. Virtual networks and subnets allow you to segment your network and control traffic flow between resources.
• Network Security Group rules: A network security group (NSG) is a firewall that controls incoming and outgoing network traffic to and from Azure resources. NSG rules specify the traffic that is allowed or denied to reach resources.
• Virtual Machine Scale Set (VMSS): A VMSS is a group of identical, load-balanced VMs that automatically scale based on demand. VMSS are used to deploy and manage large numbers of VMs, making them ideal for hosting websites with high traffic.
• Azure Load Balancer: An Azure Load Balancer distributes incoming traffic across multiple VMs, ensuring that the workload is evenly distributed and resources are utilized efficiently. This helps to improve the performance and reliability of the website.
To gain a clearer understanding of how the components are arranged, refer to the architecture below:
Creating the Resource Group
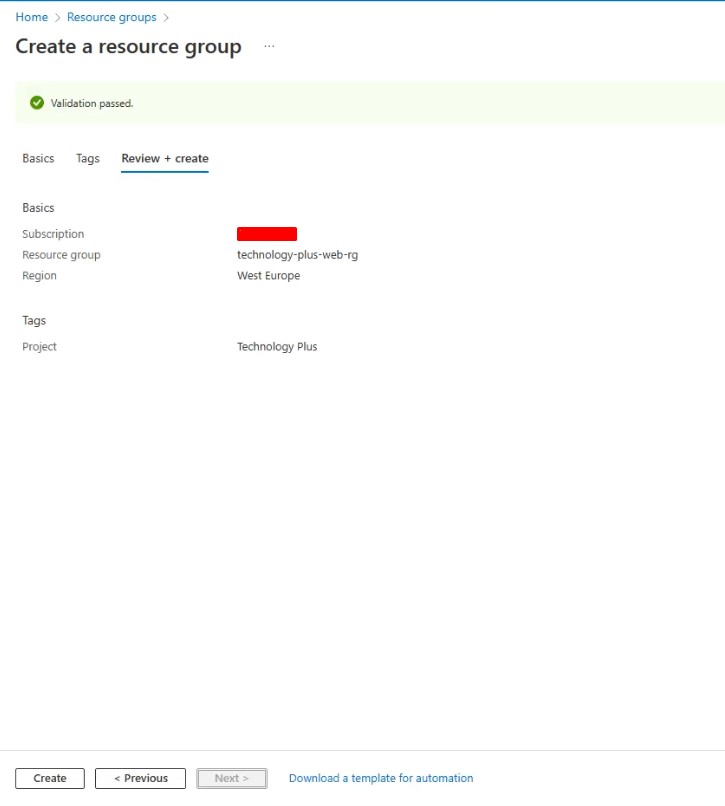
The first step in our process is to create a Resource Group, which will act as a logical container for organizing our resources. This will allow us to manage all of our resources as a single unit.
To create the Resource Group:
- Navigate to the Resource groups section in the Azure portal.
- Click “Create.”
- Select the subscription you want to use, enter a name for your Resource Group, and choose a location (region) for the group.
- Review the information and click “Create.”
Creating the Cloud-Init Configuration
The configuration file is used to specify the instructions for configuring an instance. This file, which is written in YAML, starts with the line “#cloud-config” to indicate that it is in cloud-config format.
Cloud-config files consist of modules. Each module performs a specific task or set of tasks, and they can be used to automate various aspects of instance configuration. Some common modules include:
- hostname: sets the hostname of the instance
- apt_update: updates the package list on an Ubuntu instance
- package_update: upgrades all installed packages on an instance to their latest versions
- runcmd: runs one or more commands at startup
In the configuration file we are using the package_upgrade, packages, and runcmd modules. The package_upgrade module is used to upgrade all installed packages on the instance to their latest versions. This helps to keep the instance’s software up to date and stable. The packages module is used to install one or more packages on the instance, adding new software or libraries as needed. Finally, the runcmd module is used to run commands at startup, allowing us to automate tasks and customize the behavior of the instance during the startup process.
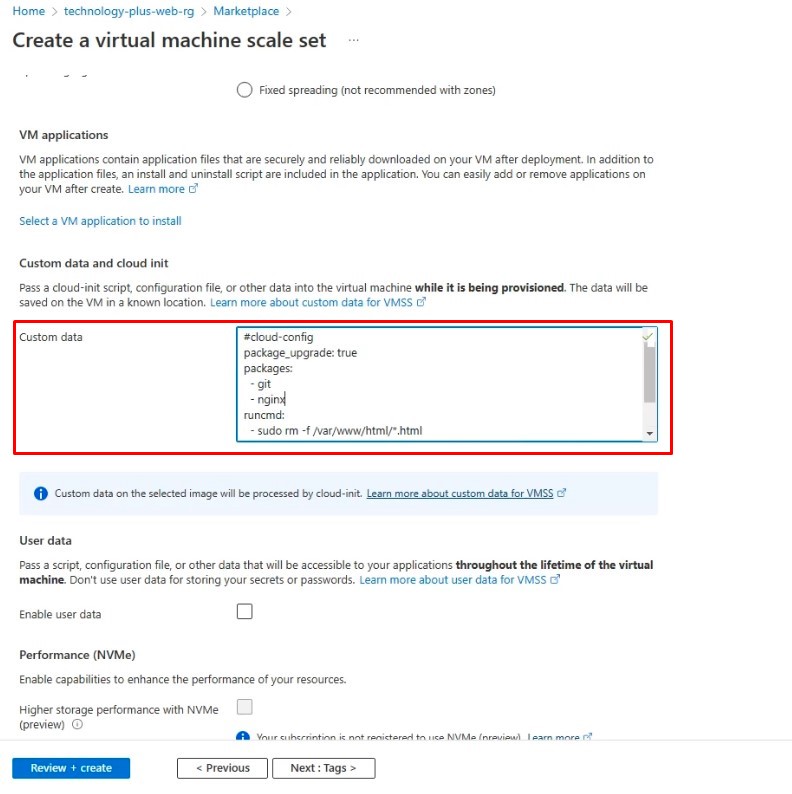
This is the cloud-init config that we will be using:
					#cloud-config
package_upgrade: true
packages:
  - git
  - nginx
runcmd:
  - sudo rm -f /var/www/html/*.html
  - git clone https://github.com/agronmuaremi/technologyplus.git
  - sudo mv -f technologyplus/* /var/www/html/
  - service nginx restart
This configuration will update packages, install git and nginx (if they are not already installed), delete all existing html files from the /var/www/html location, clone our website from the GitHub repository, move the website to /var/www/html, and restart the nginx service to use the new website.
Creating the VMSS, Load Balancer, and Using the Cloud-Init Configuration
In this step, we will create the Virtual Network, Subnet, NSG, and Load Balancer as part of the process of creating the VMSS resource.
To create a VMSS, virtual network, subnet, NSG, and load balancer at the same time, follow these steps:
- Open the Azure portal in your web browser
- Click on the “Create a resource” button in the top left corner of the portal.
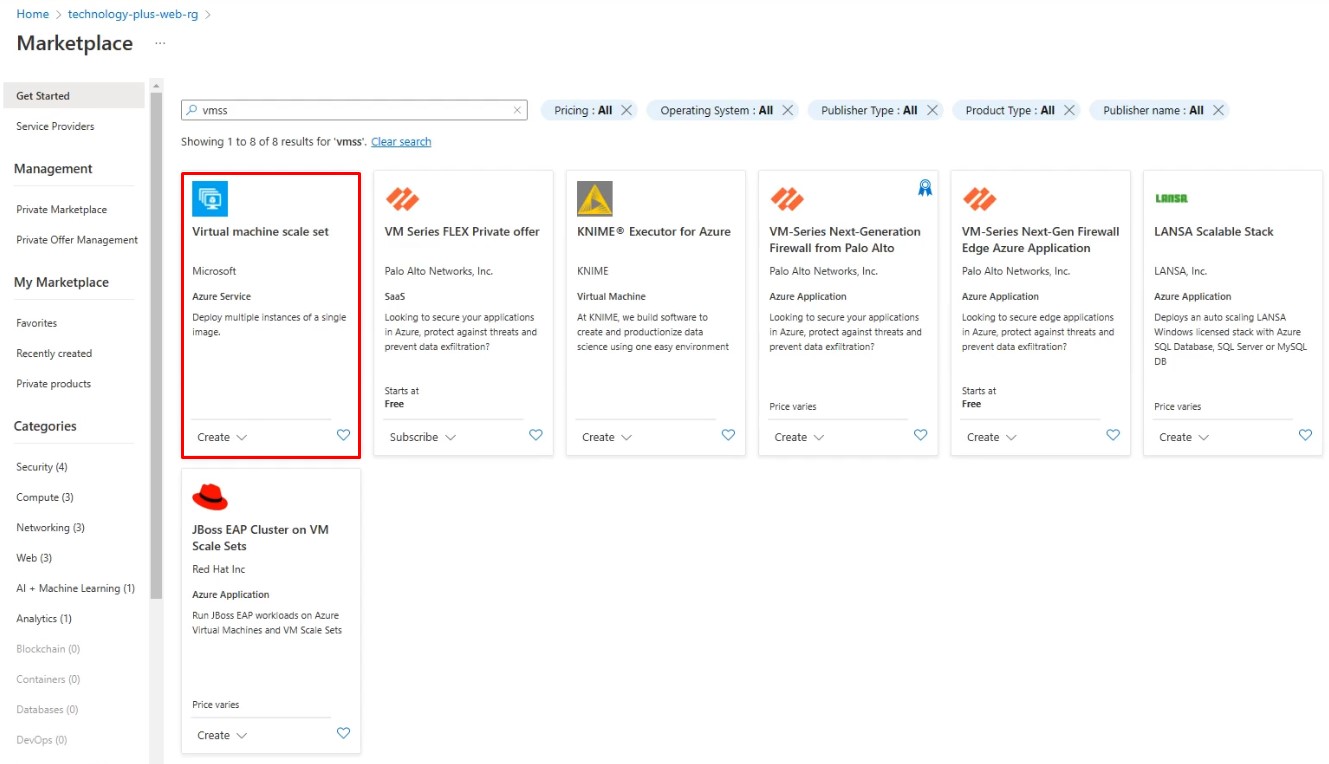
- In the search bar, type “virtual machine scale set” and press enter.
- Click on the “Virtual machine scale set” result that appears.
- Click on the “Create” button to begin creating a new VMSS.
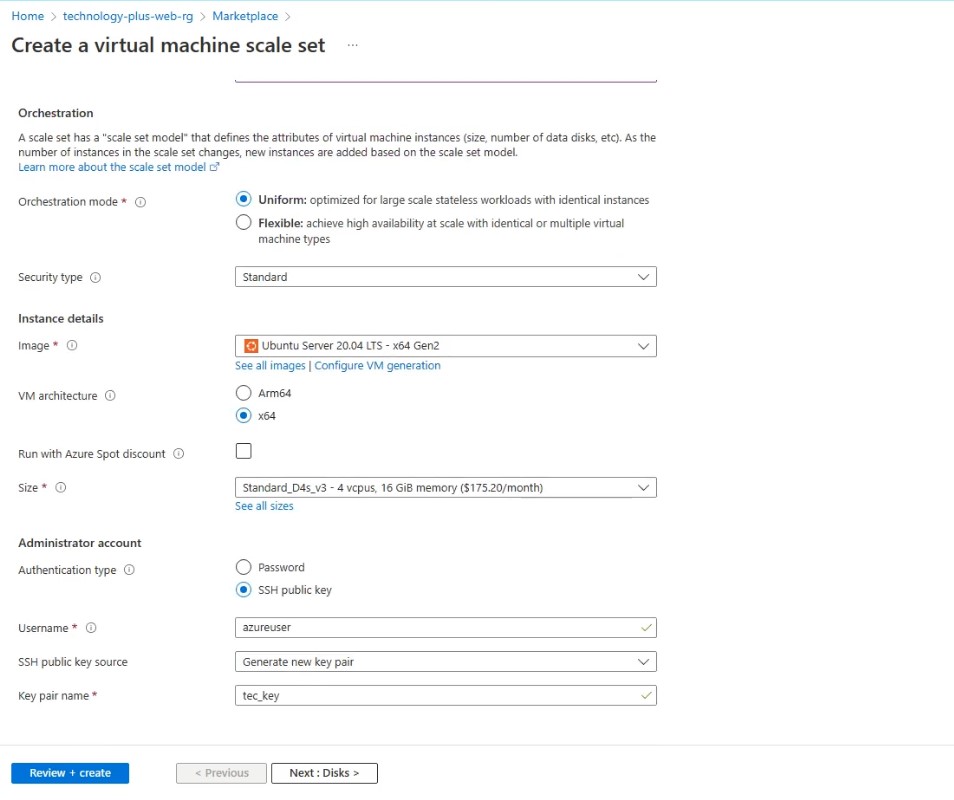
- On the “Basics” blade, enter a name for your VMSS and select the subscription, resource group, select the operating system, VM size, and location in which you want to create the VMSS. In addition, select any other desired settings. It is important to choose a Linux-based operating system (such as Ubuntu) because cloud-init is only supported in Linux distributions.
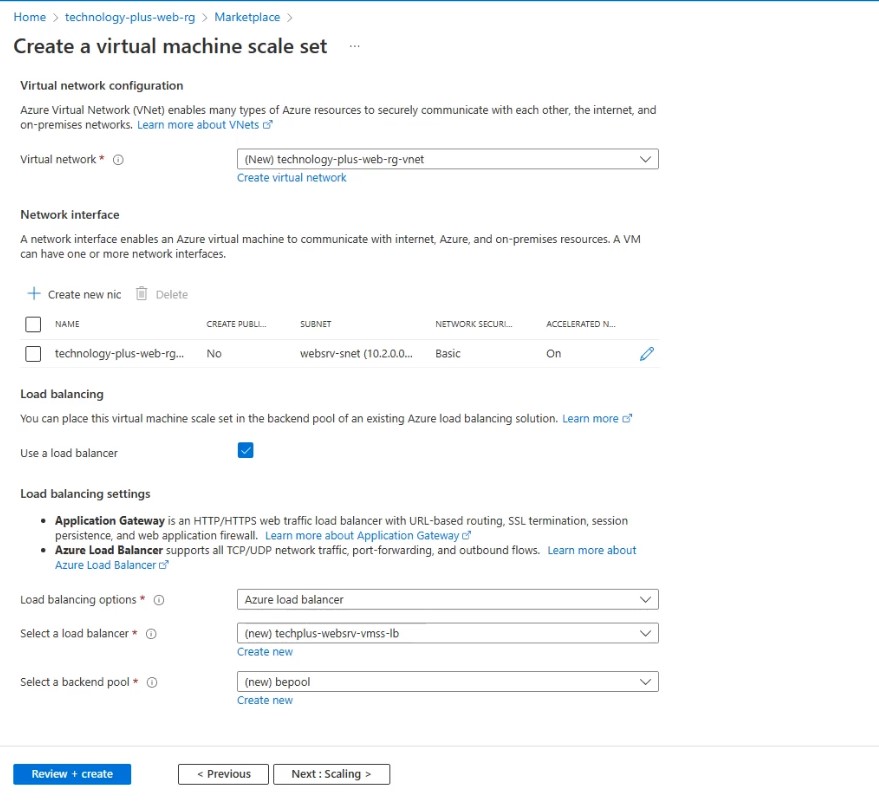
- On the “Virtual network” blade, select “Create new” for the virtual network and subnet options, and enter a name for each. Additionally, be sure to select the “Use a load balancer” option to create a load balancer and position it in front of the VMSS.
- After configuring the necessary settings, the next step is to input our cloud-init configuration on the Advanced tab under the “Custom data and cloud init” section.
Configuring Incoming Rules to Allow HTTP Traffic
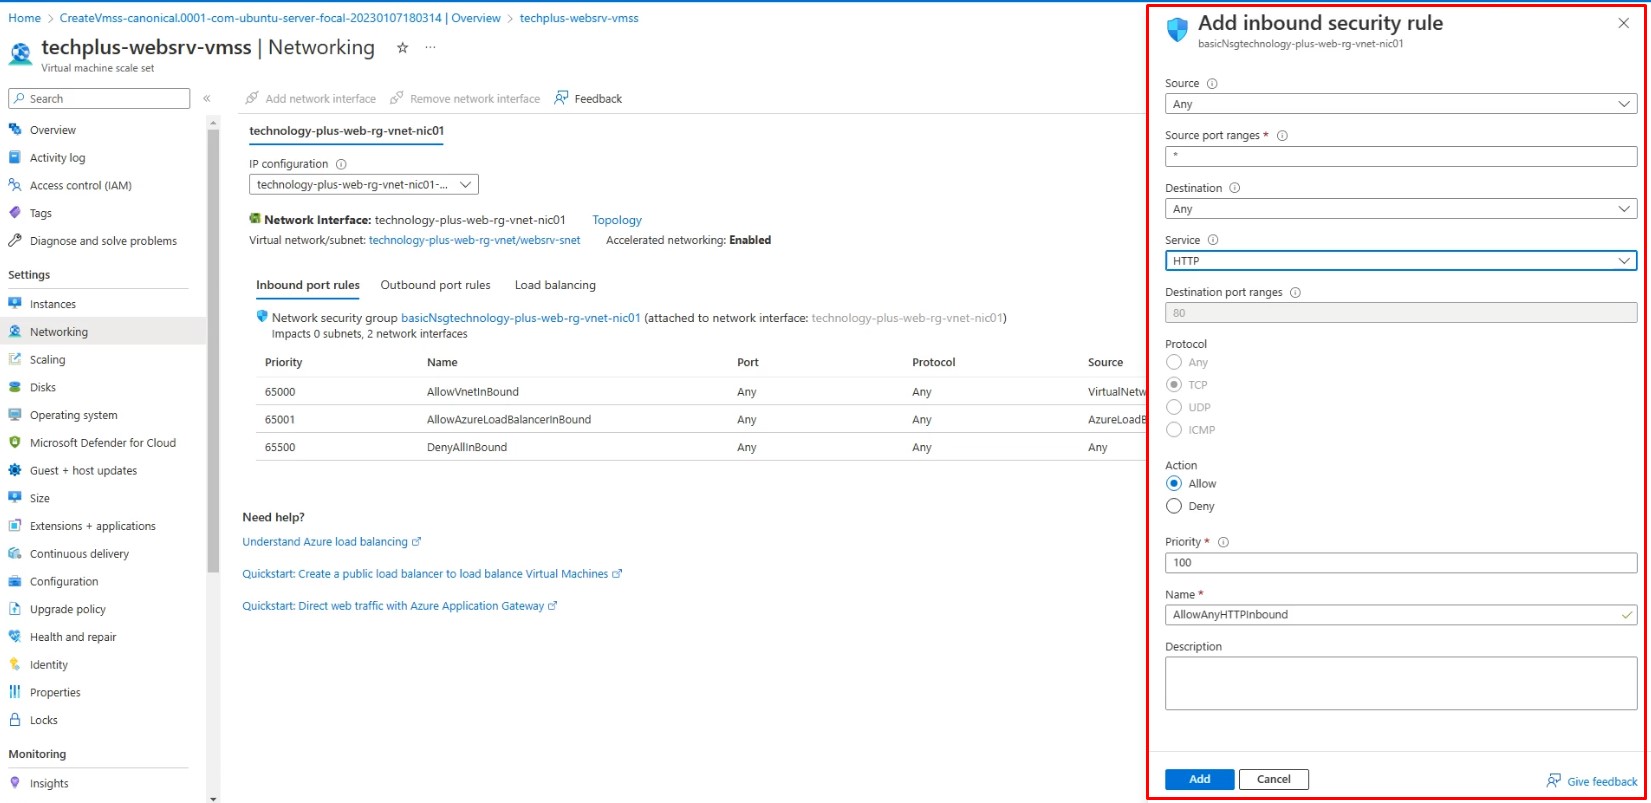
To access the website, we must create an incoming rule on the network security group that will permit HTTP traffic over port 80.
Navigating to the Website
Now it’s time to test everything and visit our website. To do so, we will need to locate the public IP of the load balancer. This can be found on the overview page of either the virtual machine scale set or the load balancer.

Best Practices
- Use autoscale settings with VMSS to ensure that you have the right number of VMs to handle the workload.
- Use monitoring and alerting tools, such as Azure Monitor, to track the performance and availability of your VMSS and take action when necessary.
- In an enterprise environment, use custom images to create VMSS with pre-configured settings and save time on configuration (instead of using cloud-init).
- Test your cloud-init configuration thoroughly before deploying it to production.
- Use version control to track changes to your cloud-init configuration and roll back if necessary.
- Keep your cloud-init configuration up to date to ensure that your VMs are running the latest version of the configuration.
Summary
Virtual Machine Scale Sets (VMSS) can be used to host a website and cloud-init configuration can be used to automate the configuration of each VMSS instance. This tutorial covered several Azure concepts, including resource groups, virtual networks and subnets, network security groups, and Azure Load Balancers. It also outlined the organization of the components needed for this process, including the configuration file, modules, and tasks that can be automated with cloud-init.

