
Azure Architecture – Deploy WordPress, Implement CDN and Configure Monitoring
- TL;DR
- High Level Architecture
- Diagram Overview
- Creating a Resource Group
- Creating the database Azure Database for MySQL
- Configuring the database – Azure Database for MySQL
- Installing WordPress – Azure App Services
- Configuring the Web App to communicate with the database – Azure App Services
- Implementing a CDN – Azure CDN
- Configure a Custom Domain – Azure CDN
- Is it enough? – Enabling monitoring using DataDog
- Creating a Service Principal for authorization
- Creating an Event Hub
- Creating a Function App
- Add the code to the function
- Configuring Diagnostic Settings
- Recap
TL;DR
In this post we go over various components and how to configure them – we start by creating and configuring the database, continue with deploying WordPress on App Service using containers, implement CDN and configure the CDN endpoint to use Custom Domains and in the end we touch the concept of creating Event Hubs and Function Apps as well as configuring Diagnostic Settings on the Web App so that we can properly monitor the environment using DataDog Cloud monitoring as a Service.
If you are ready, let’s go:
Before diving into the set up and configuration, let’s discuss the High Level Architecture Diagram and the components that will be used to implement this solution.
High Level Architecture Diagram Overview
If you are ready, let’s go:
Before diving into the set up and configuration, let’s discuss the High Level Architecture Diagram and the components that will be used to implement this solution.
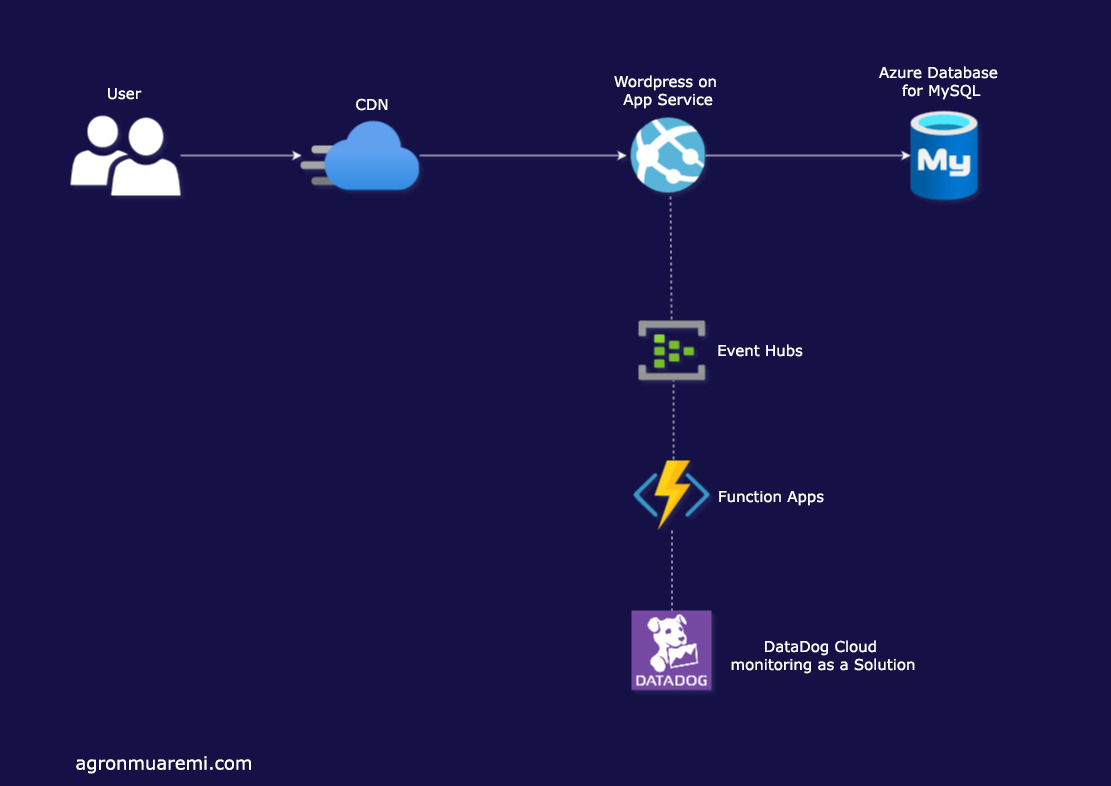
Users: are the visitors that will use our wordpress website.
CDN: is a distributed network of servers that are used to cache the content of a website and then serve that content from servers that are closer to the user (this improves performance and decreases latency)
App Service: a platform as a service offered by Azure which you can use to host your web applications without worrying about managing the underlying infrastructure. More info: https://agronmuaremi.com/app-service-web-apps.html
Azure Database for MySQL: a fully managed database service which will be used as a database for our WordPress website.
Event Hub: a platform used to collect large amount of data into a single place. It will be used to collect metrics and logs from the Web App.
Function App: a platform used to host small pieces of code (functions) that perform a single task. It will be used to send the collected data from the event hub into DataDog. More info: https://agronmuaremi.com/function-apps.html
DataDog: a third-party provider used for monitoring.
Creating a Resource Group
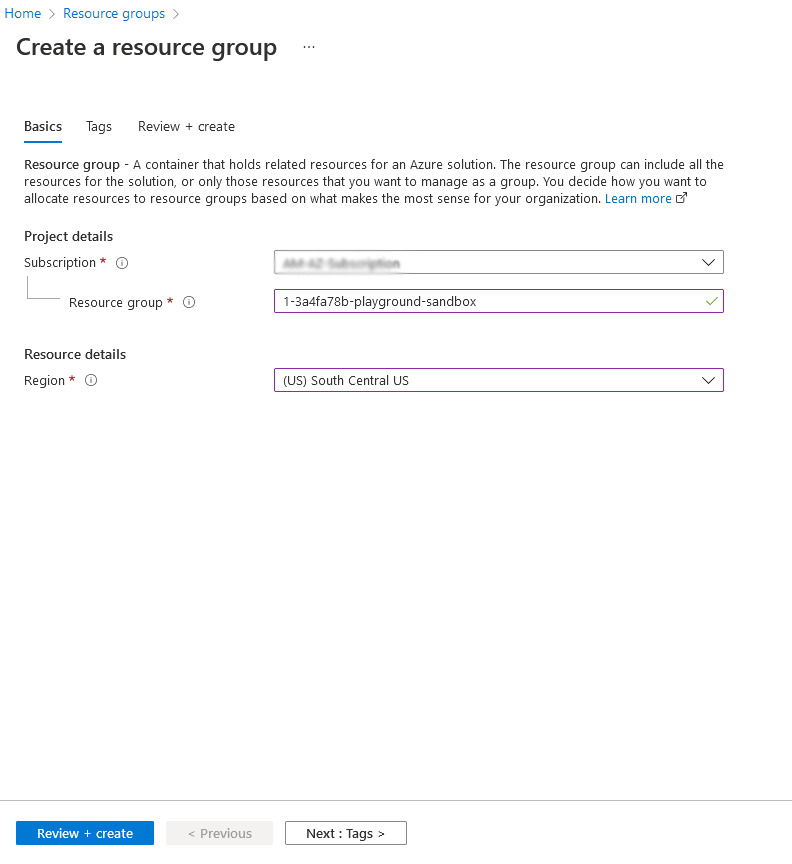
As a first step, we are going to create a Resource Group – which will act as a logical container for grouping our resources together.
To create the resource group:
- Find the Resource groups object in the Azure portal
- Choose Create
- Choose the subscription you want to use, the name that you want your resource group to have and the location (region) of your resource group.
- Click Review + create.
Creating the database - Azure Database for MySQL
Now that we have the resource group created , we will start the process by creating the database.
Follow the steps below to deploy Azure Database for MySQL instance:
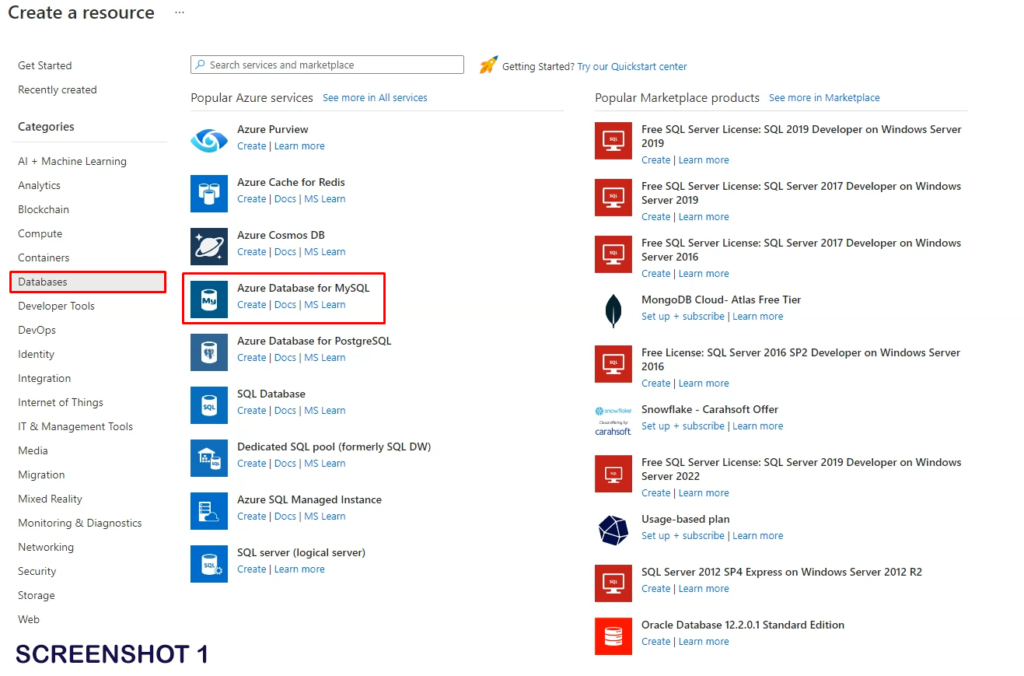
- Choose the Create a resource option displayed on the landing page
- Under Databases category choose Azure Database for MySQL and click Create
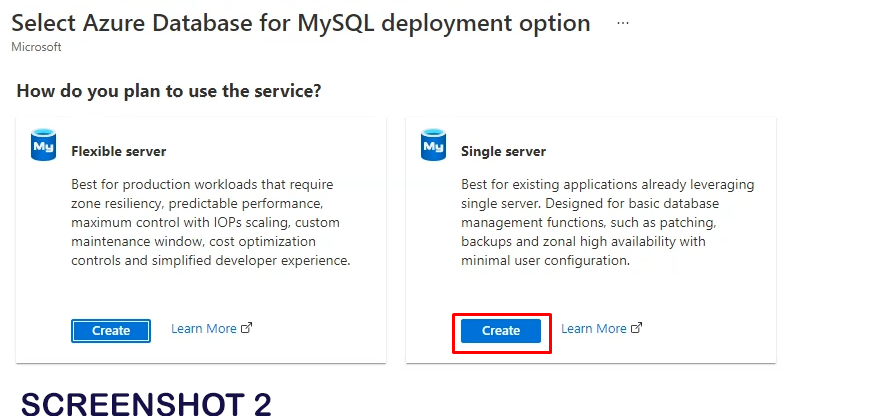
- Select one of the two options Flexible server or Single server (this demonstration uses Single server)
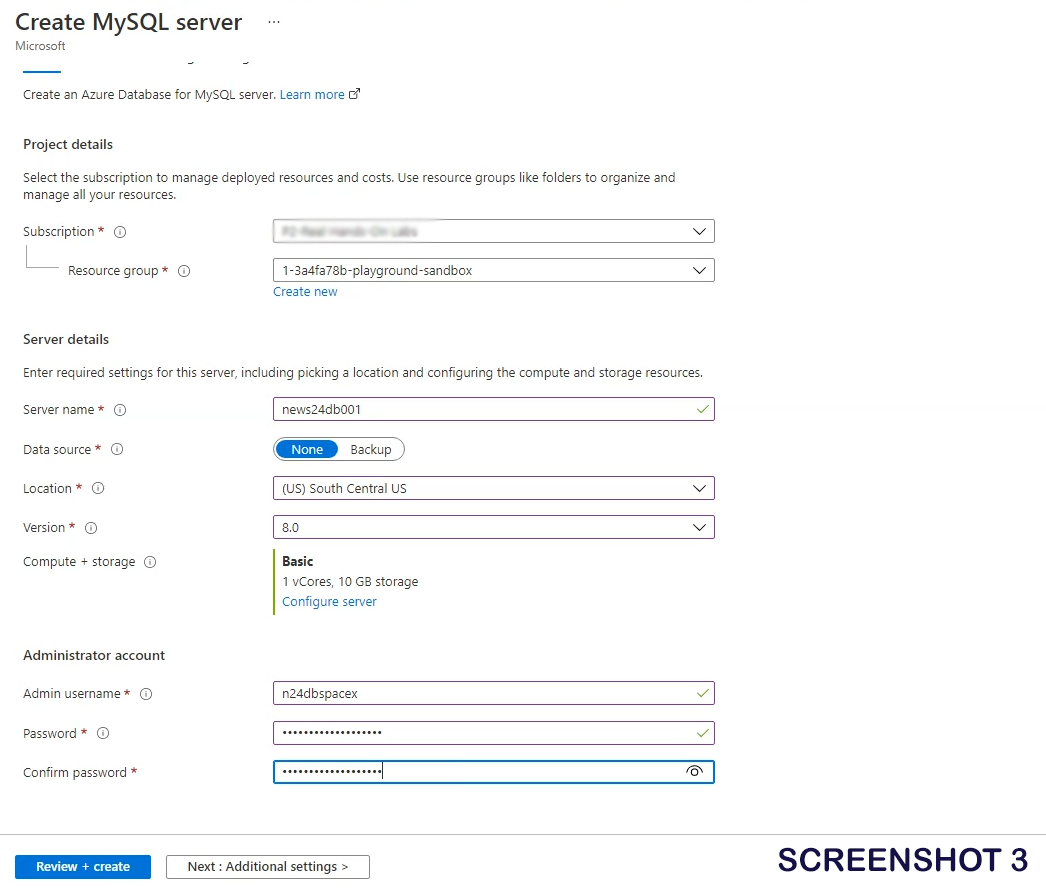
- Click on Create and fill in the necessary information:
- Resource Group: the resource group that we just created
- Server name: this will be the name of the MySQL server – in our example it is news24db001
- Location: the same location that you chose for your
- Resource Group: this way we will place all of the resources in a geographically close location and minimize delays.
- Version: choose the MySQL version – in our example we choose the latest one 8.0
- Compute + storage: this will be the SKU of your database – choose based on your needs – in our example we choose the smallest SKU as this database will be for demonstration purposes – it is important to choose the correct SKU at creation since changing it later is not supported.
- Admin username and password: choose the username and password for your database
5. Proceed to create the database – Review + create –> Create
Configuring the database - Azure Database for MySQL
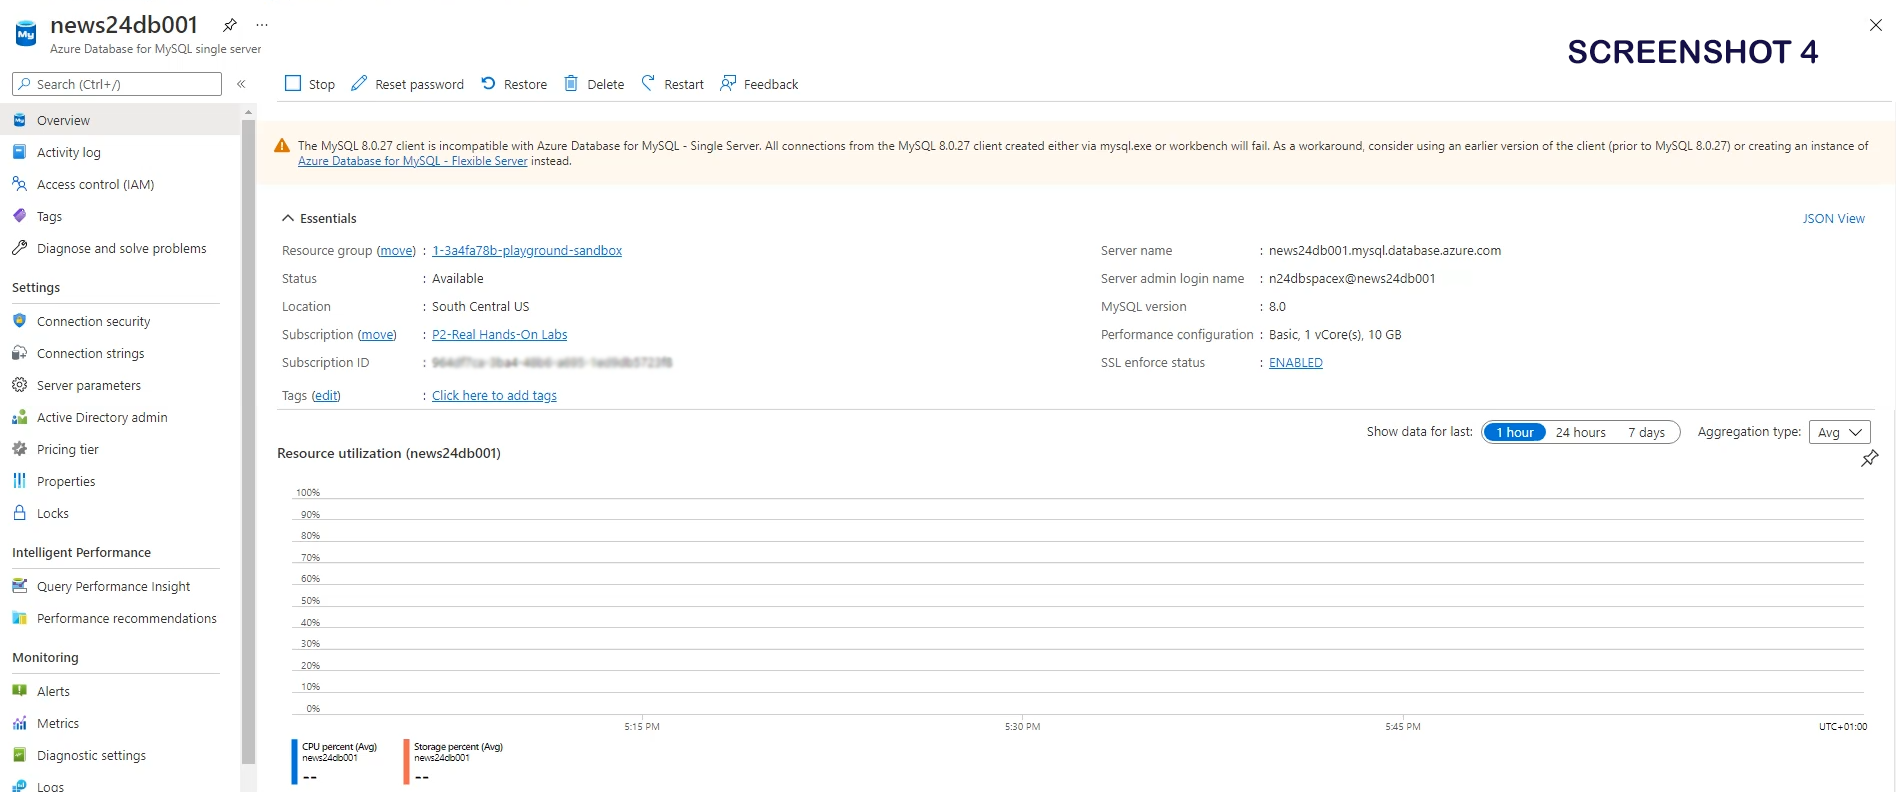
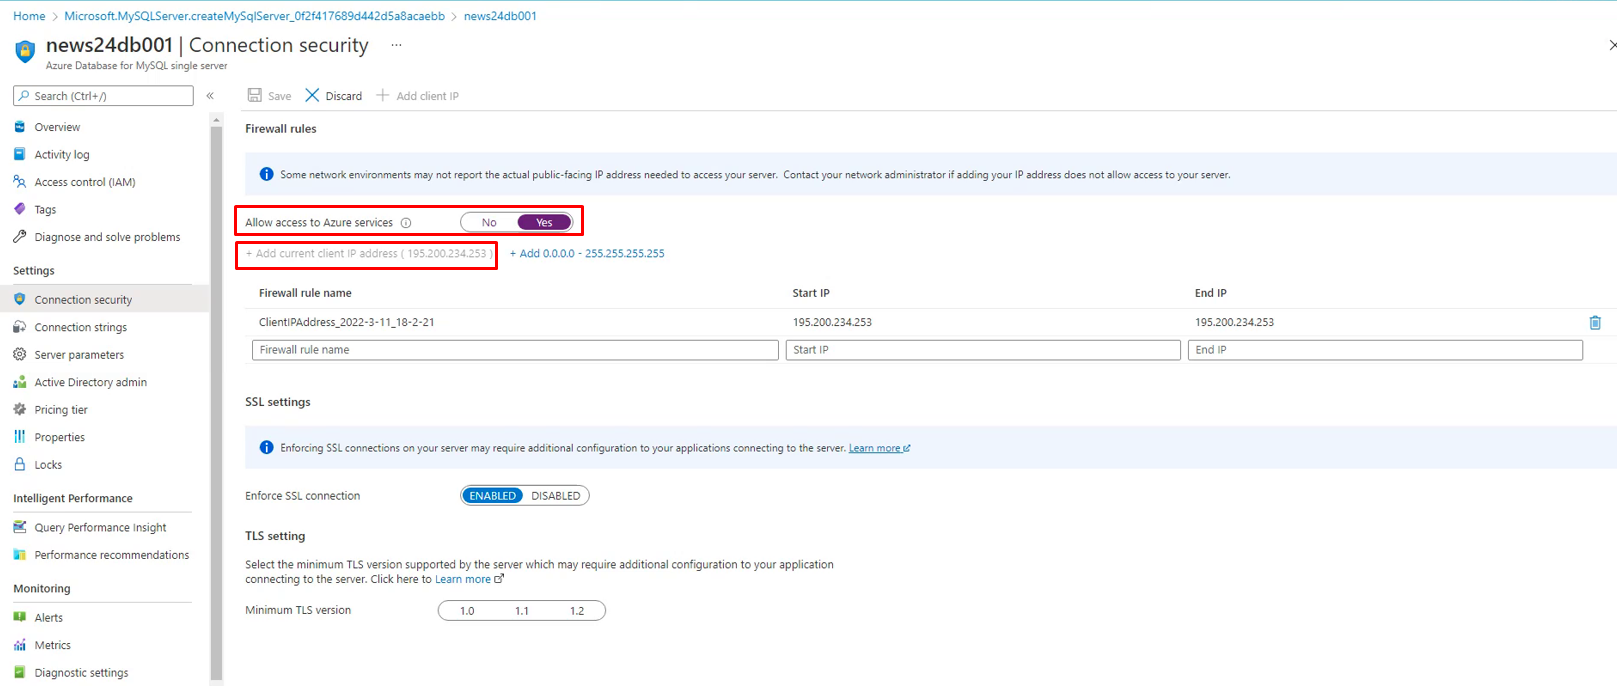
Azure Database for MySQL instance has been created. Next step in our journey is to configure firewall rules so that the web app and our PC can talk to the database.
Follow the steps below to configure firewall rules:
- Navigate to the newly created Azure Database for MySQL instance
- Under Settings choose Connection security
- Enable “Allow access to Azure services” – this will allow the Web App to communicate with Azure Database for MySQL instance.
- Click on “Add current client IP address (x.x.x.x)” – this will allow us to connect remotely to the Azure Database for MySQL instance.
- Save the changes
We are now ready to connect to Azure Database for MySQL and create a blank database called “wordpress” – which will later be populated by WordPress when it is installed.
Follow the steps to connect and create the “wordpress” database:
- Install and open HeidiSQL (https://www.heidisql.com/download.php)
- Use +New to create a new session
- Configure the following options:
Network type: this specifies the driver that HeidiSQL will use to connect – choose MariaDB or MySQL (TCP/IP)
Hostname/IP: this will be Server name of your Azure Database for MySQL instance which you can find in the overview page – ex. news24db001.mysql.database.azure.com
User: the username you specified during creation
Password: the password you specified during creation
SSL: under SSL tab , make sure to enable SSL usage
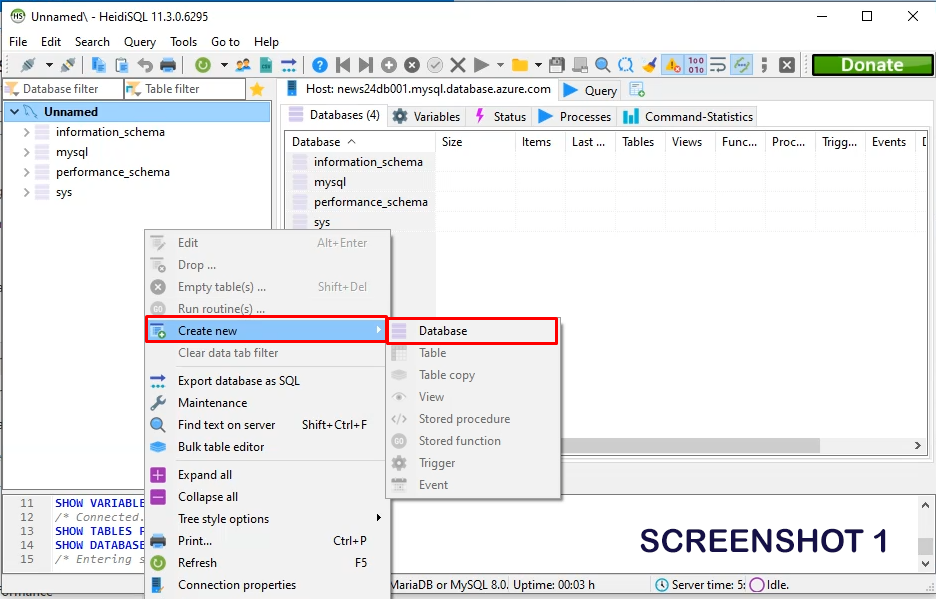
4. Click on Open to establish a connection (if the firewall rules and the configuration options are correct, you will connect to the instance.)
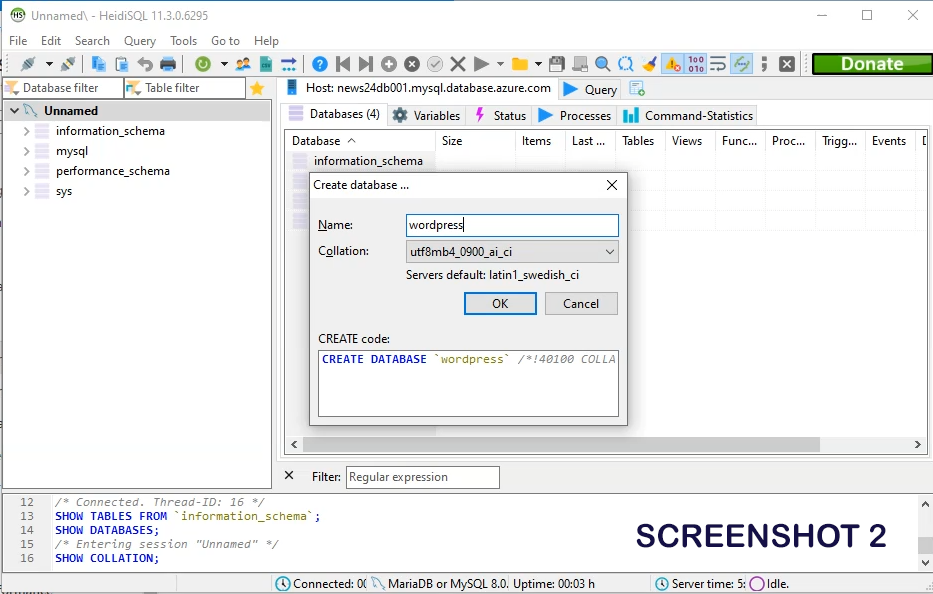
5. After you have established a connection, right-click under databases page (left-side) and select Create new -> Database
6. Enter wordpress as the database name and click on OK (this will create a blank database which wordpress will populate later on)
7. Disconnect from the database (and it is recommended that you remove the firewall rule that you set for your PC)
The main thing to look for when choosing a gateway SKU is the number of S2S/P2S connections supported, the maximum available bandwidth, and whether that SKU supports availability zones for high availability.
Installing WordPress - Azure App Services
Now that our database is setup and configured, we will proceed with the next step: Creating the Web App which will host WordPress
Follow the steps to create a Web App running WordPress:
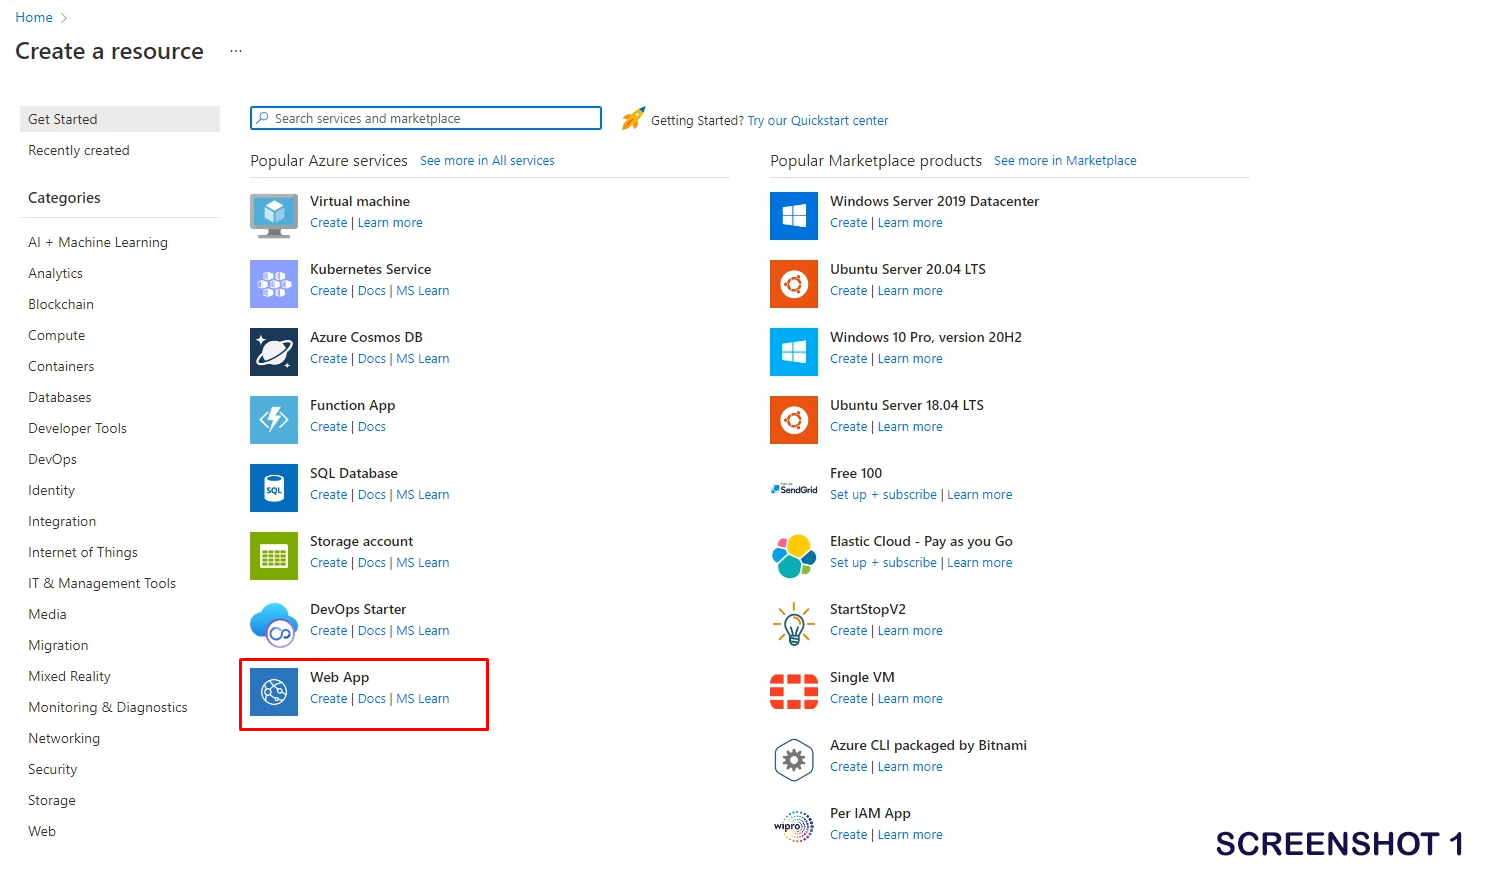
- Choose the Create a resource option displayed on the landing page
- Under Web category choose Web App and click Create
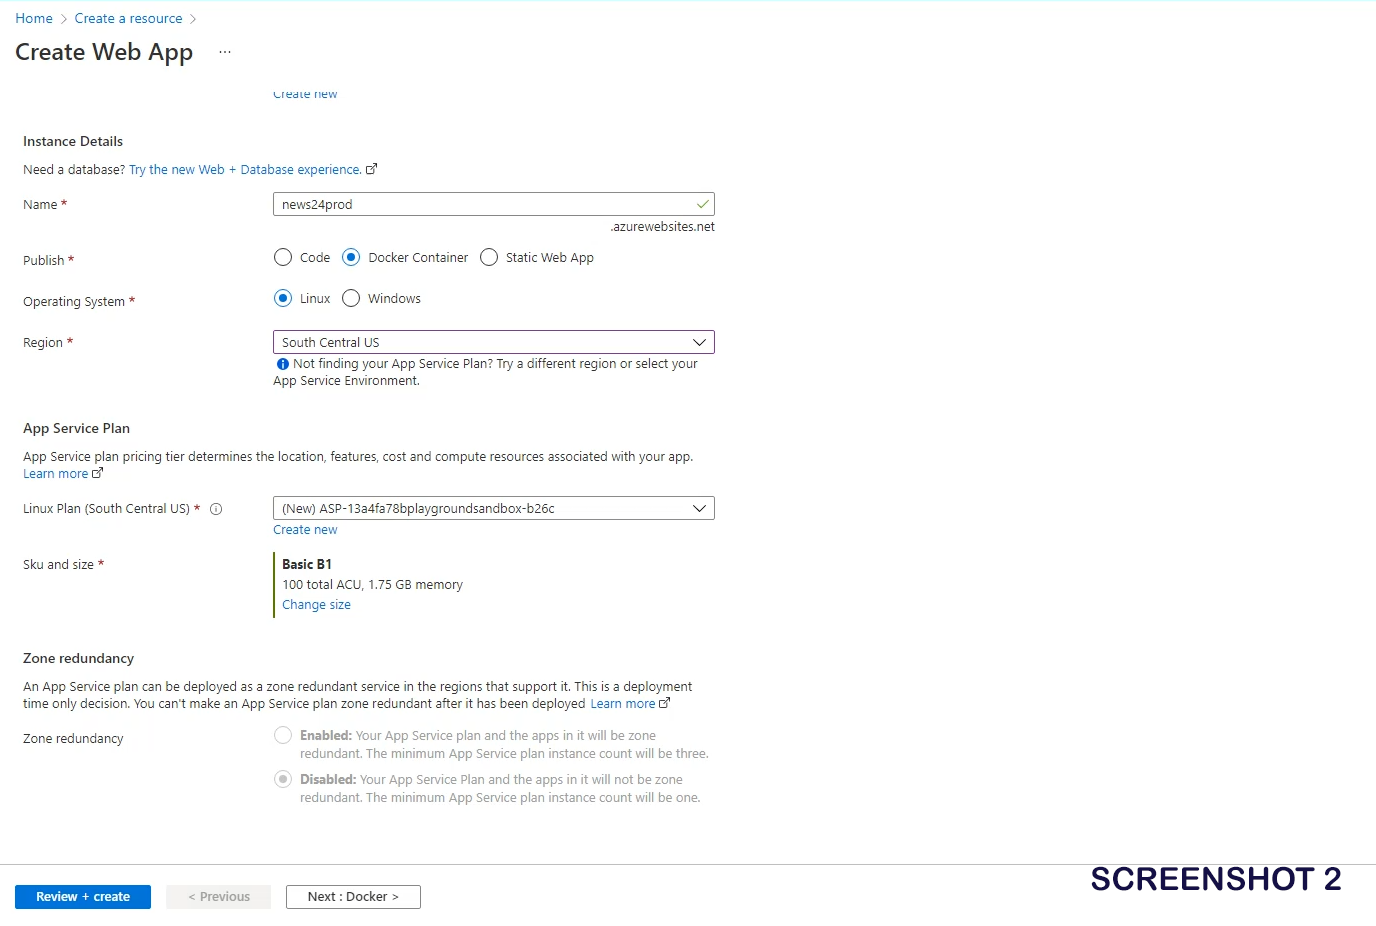
- Fill in the necessary information:
- Resource group: specify the one we created above
- Name: the name of the web app – in our case news24prod
- Publish: select Docker Container – as we will be creating wordpress on a container
- Region: select the same region as othe resources
- App Service Plan: select a SKU based on your needs. You can also change it after creation.
4. Continue by choosing Next
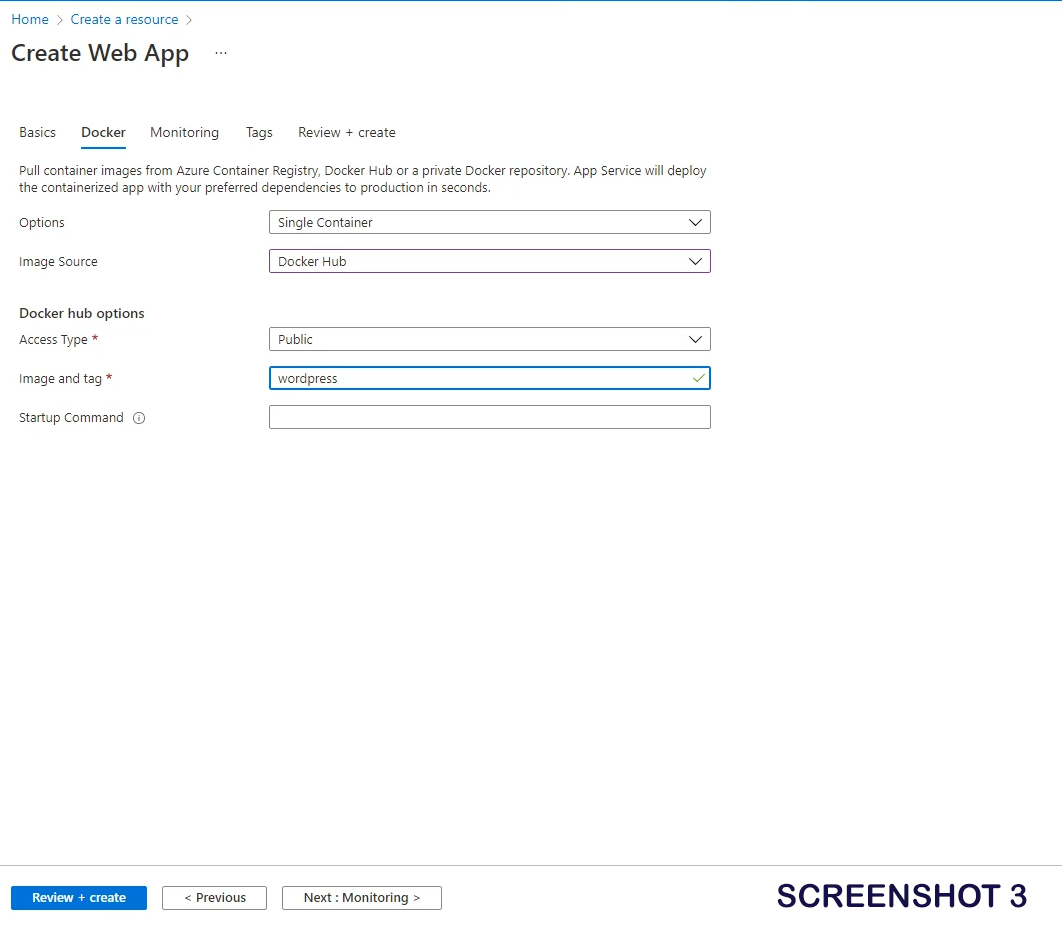
5. Fill in the necessary information:
- Options: Single Container
- Image Source: Docker Hub
- Access Type: Public
- Image and tag: wordpress
6. Deploy the web app by using Review + create -> Create
Configuring the Web App to communicate with the database - Azure App Services
Now that we have successfully created and configured the database and deployed our Web App, we will need to connect the Web App to the Azure Database for MySQL instance.
Follow the steps to configure the Web App to communicate with the database:
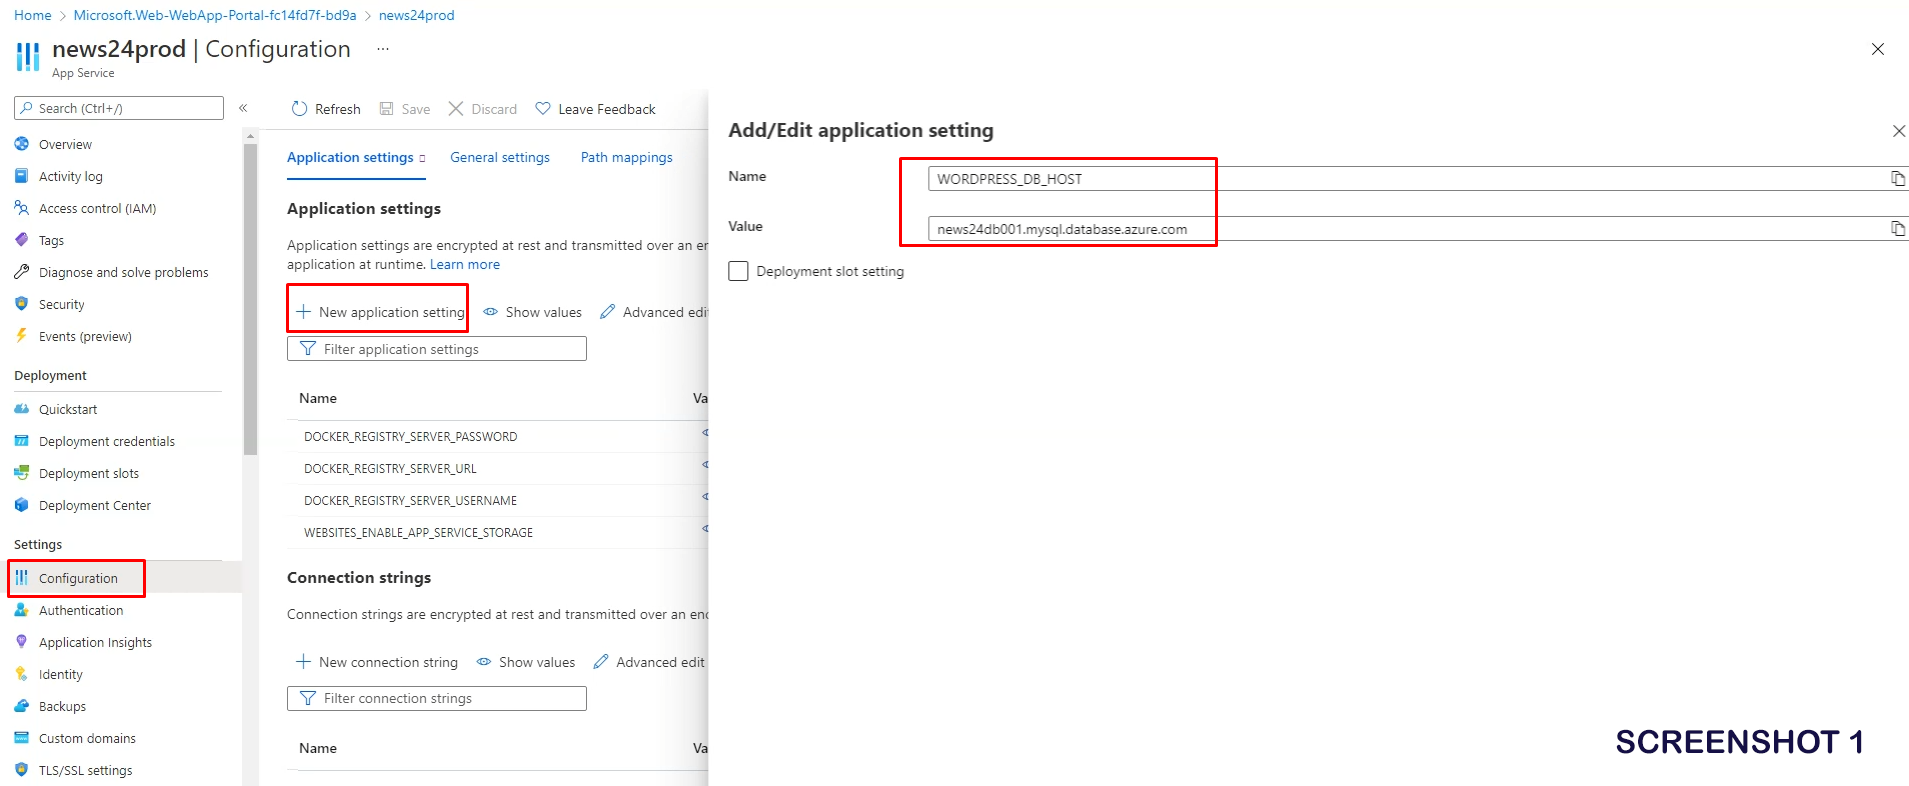
- Navigate to the newly created Web App
- Under Settings choose Configuration
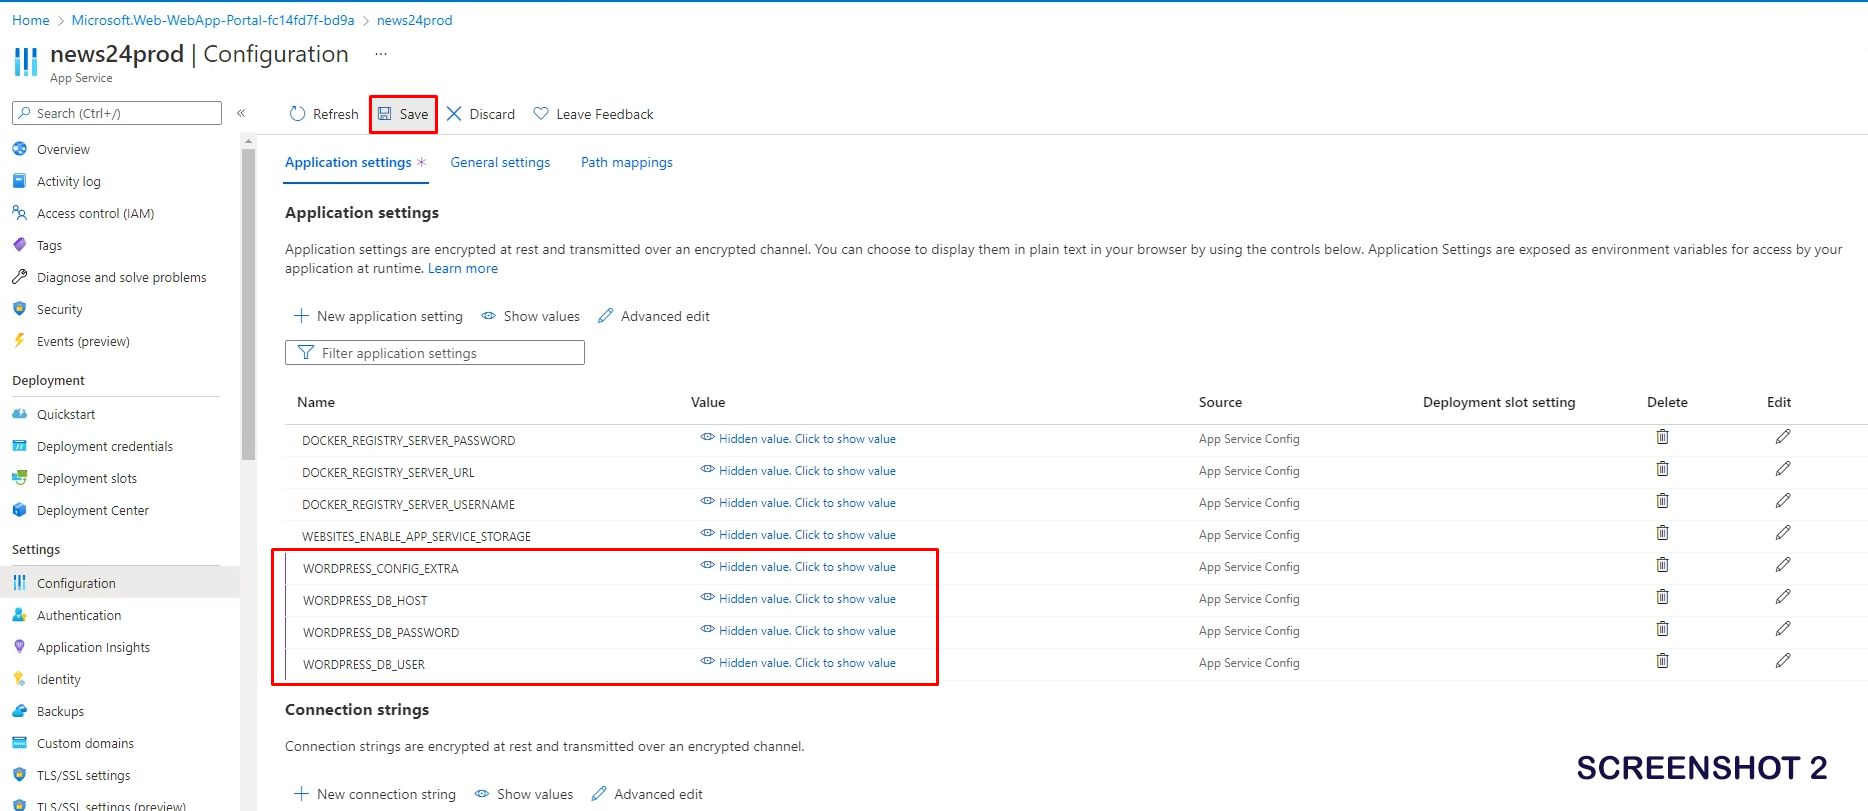
- Under Application settings choose New application setting. (we will need to create the following 4 settings specified below):
- WORDPRESS_DB_HOST = Server name of your Azure Database for MySQL instance which you can find in the overview page – ex. news24db001.mysql.database.azure.com
- WORDPRESS_DB_USER = the username you specified during creation of your Azure Database for MySQL instance
- WORDPRESS_DB_PASSWORD = the password you specified during creation of your Azure Database for MySQL instance
- WORDPRESS_CONFIG_EXTRA = define( ‘MYSQL_CLIENT_FLAGS’, MYSQLI_CLIENT_SSL ); – these are some extra options which tells wordpress to use SSL by default.
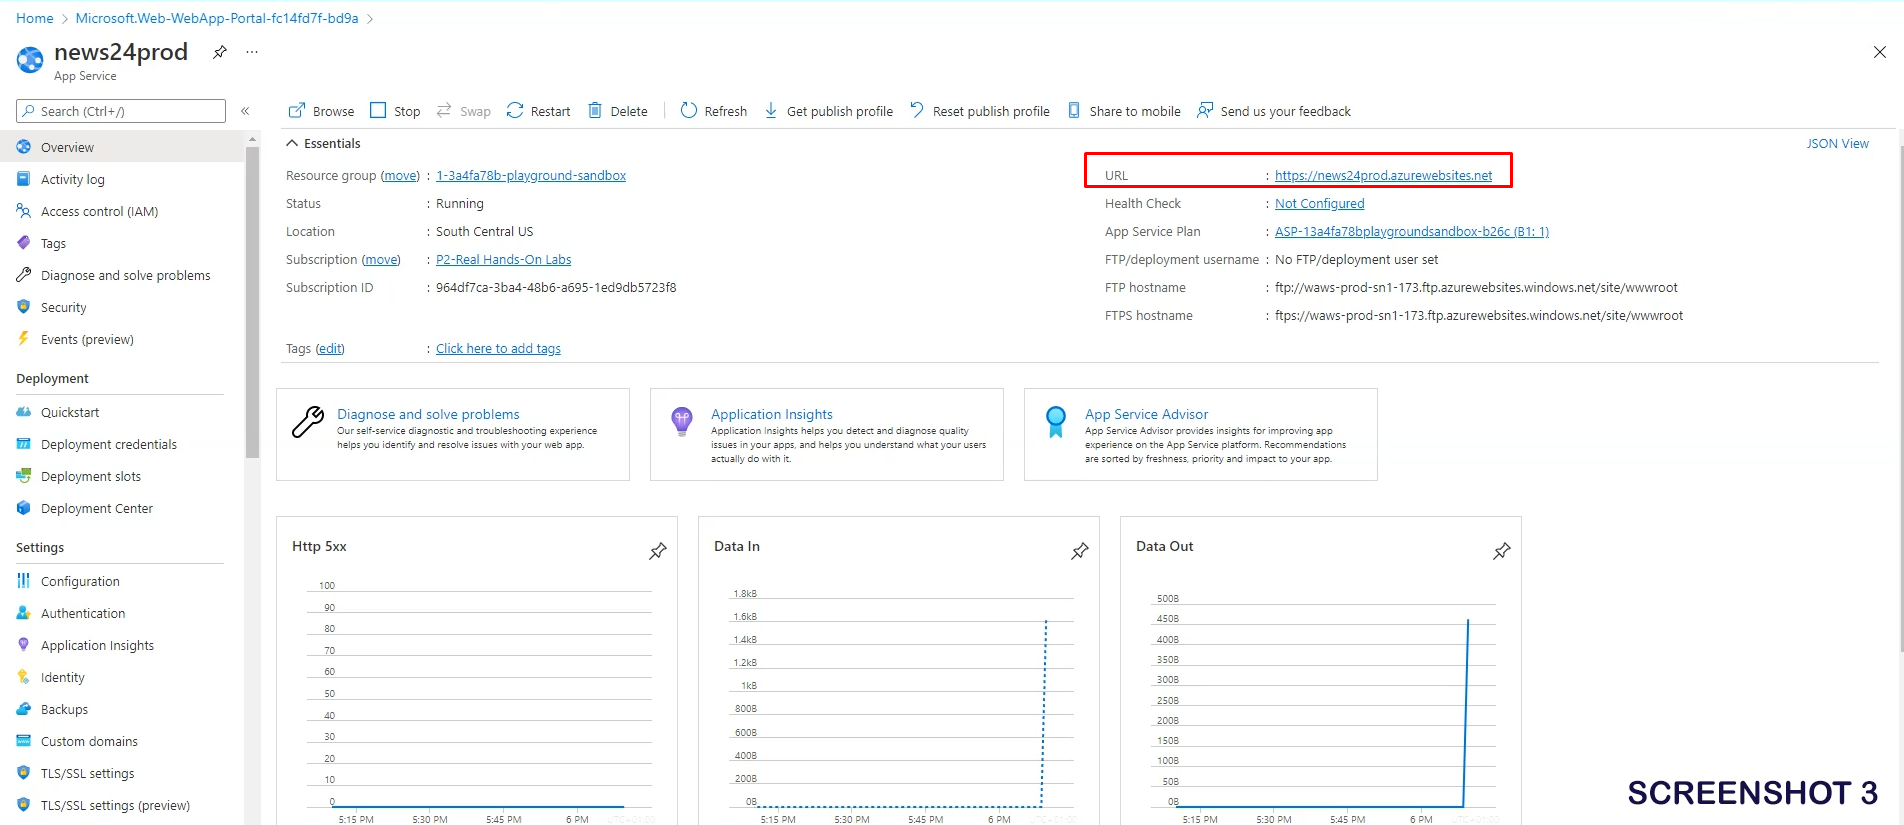
4. Navigate to the Overview page of your Web App and click the URL (ex. news24prod.azurewebsites.net)
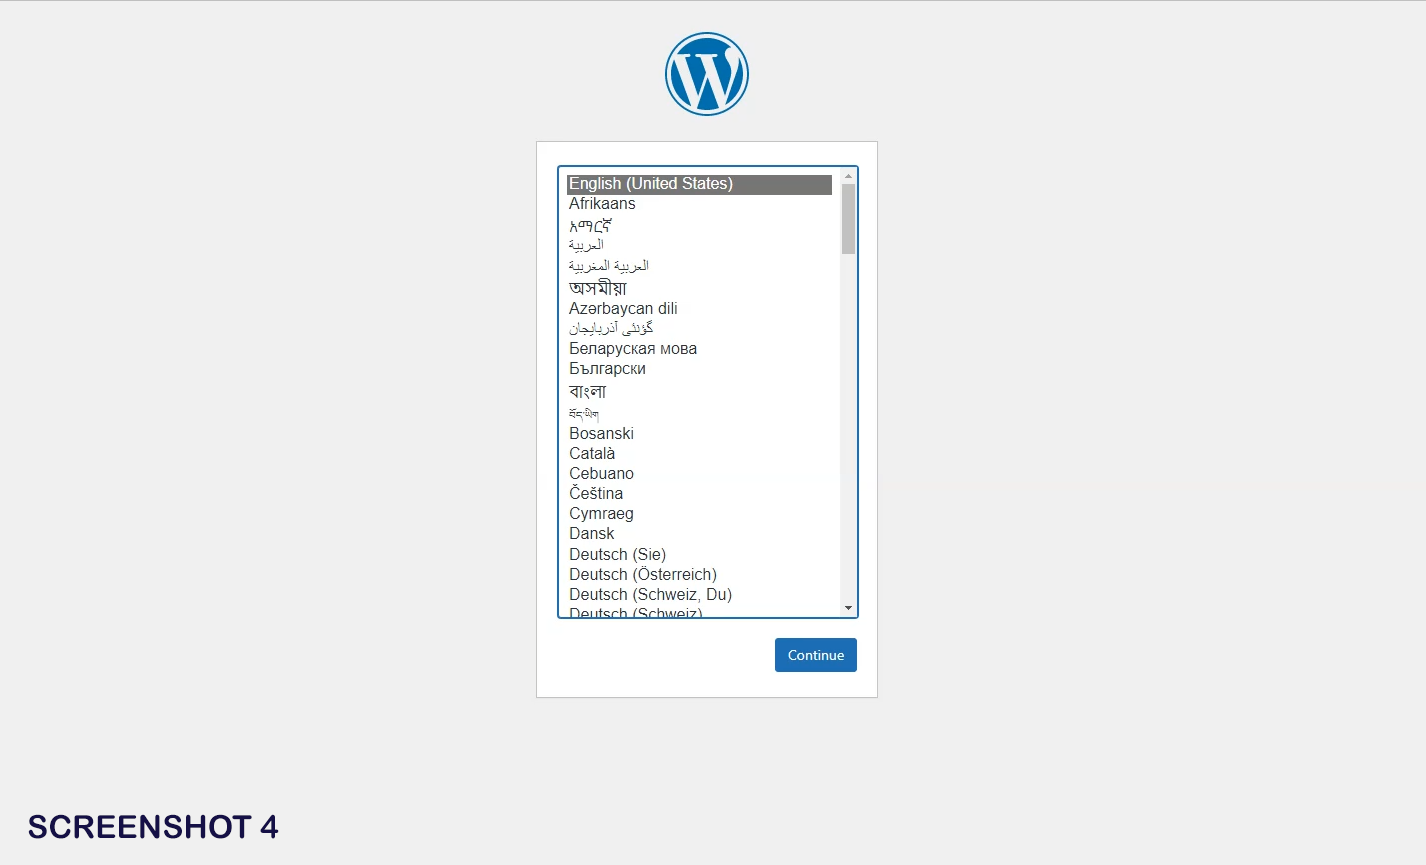
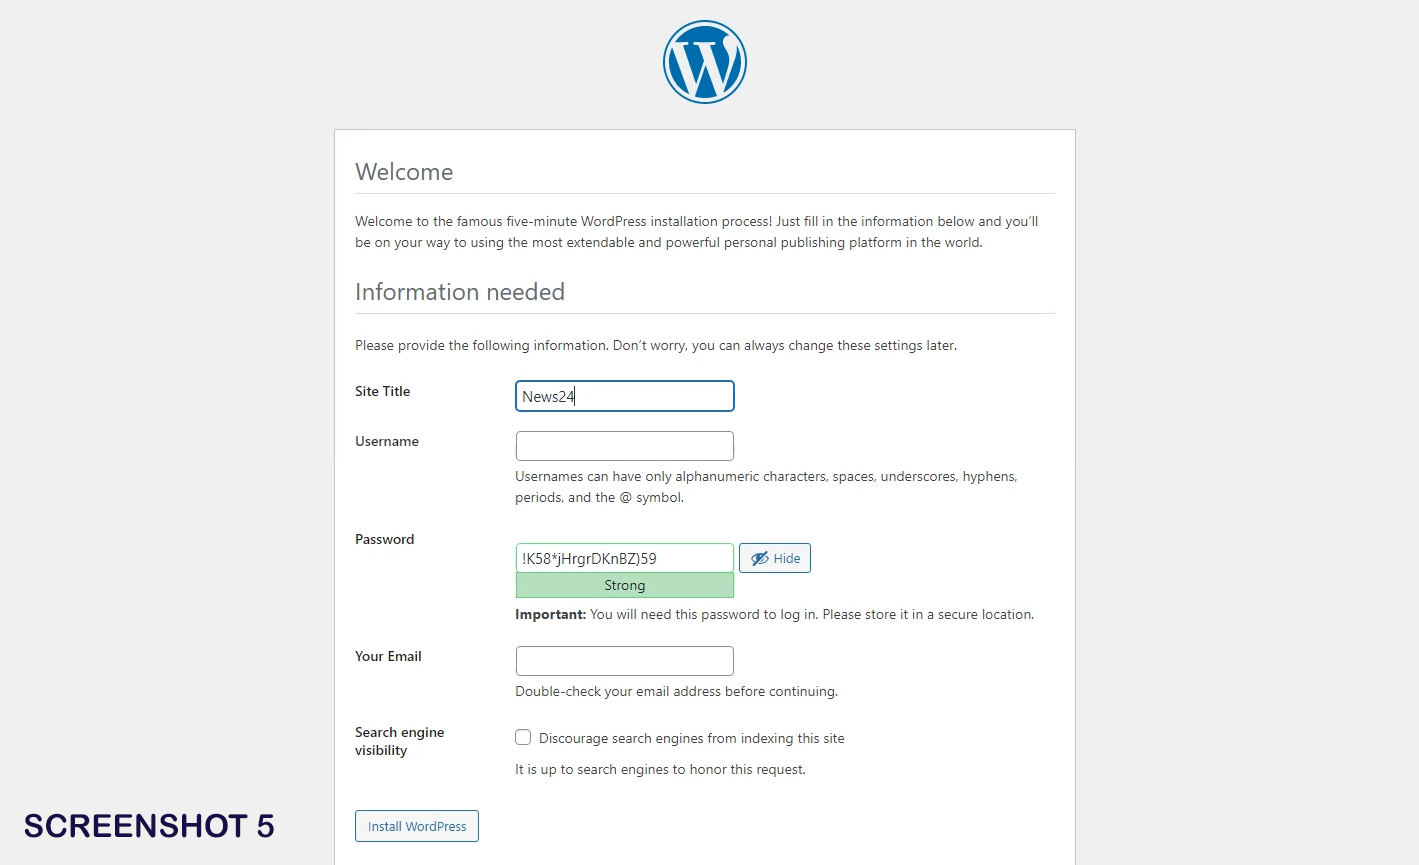
5. After a while , you will be displayed with the WordPress Installation & Configuration Page.
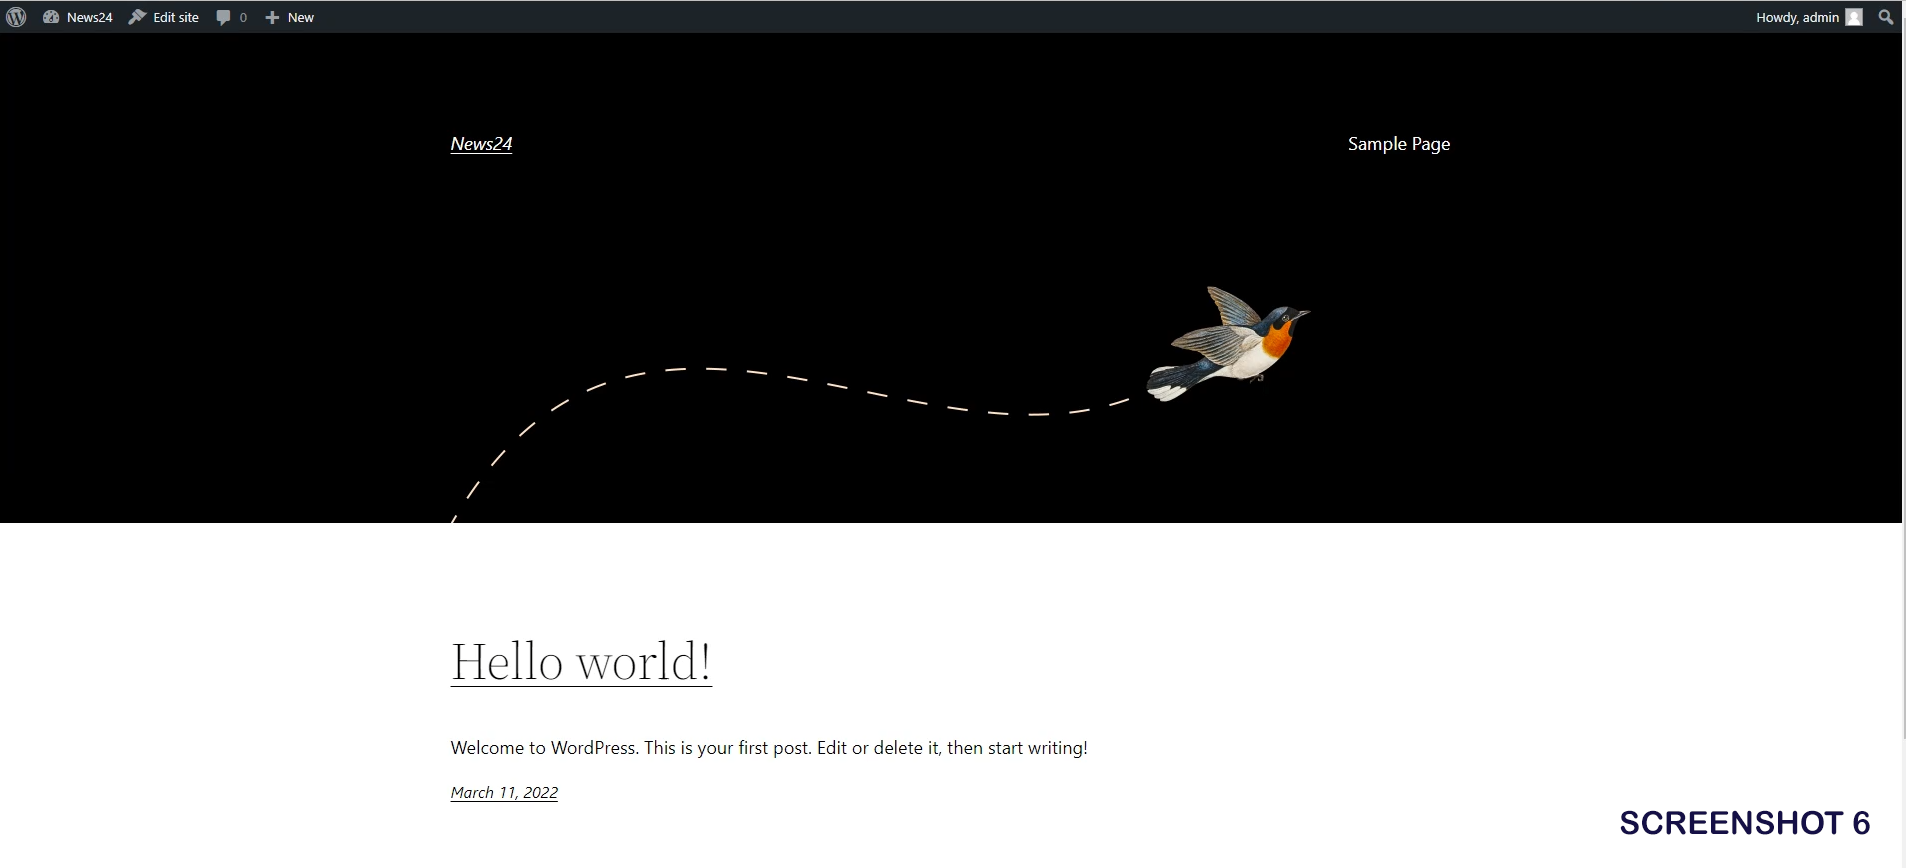
6. Fill in the necessary options and voilà your wordpress site is up and running.
Implementing a CDN - Azure CDN
Now you have two options, you can stop here and be happy with your website or you can continue with me and set up a CDN to make your website even more awesome 😀
Follow the steps to create a CDN profile and configure a CDN endpoint for your Web App:
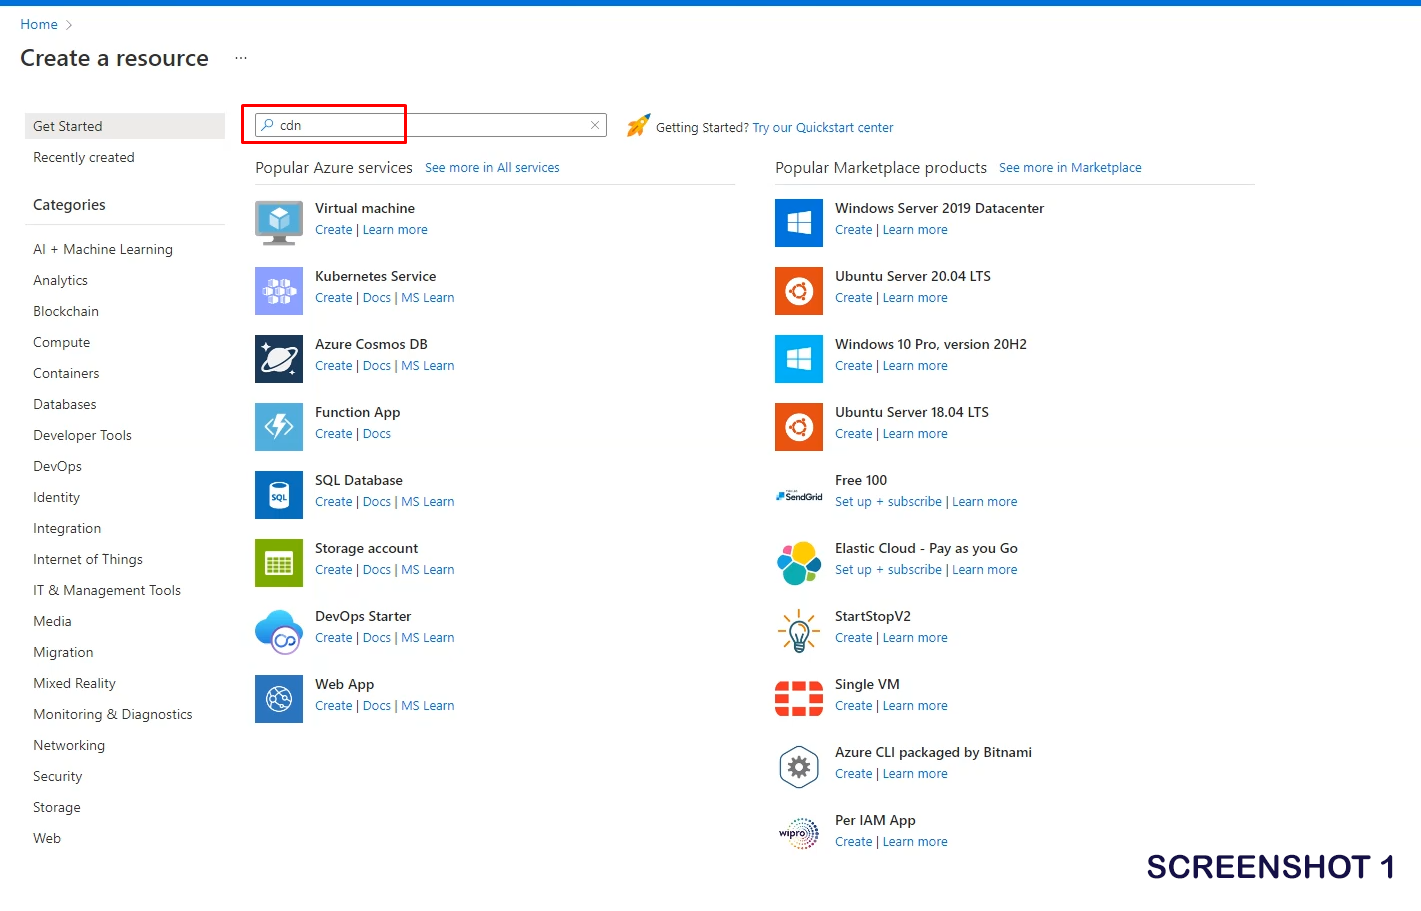
- Choose the Create a resource option displayed on the landing page
- Search for CDN and click on Create
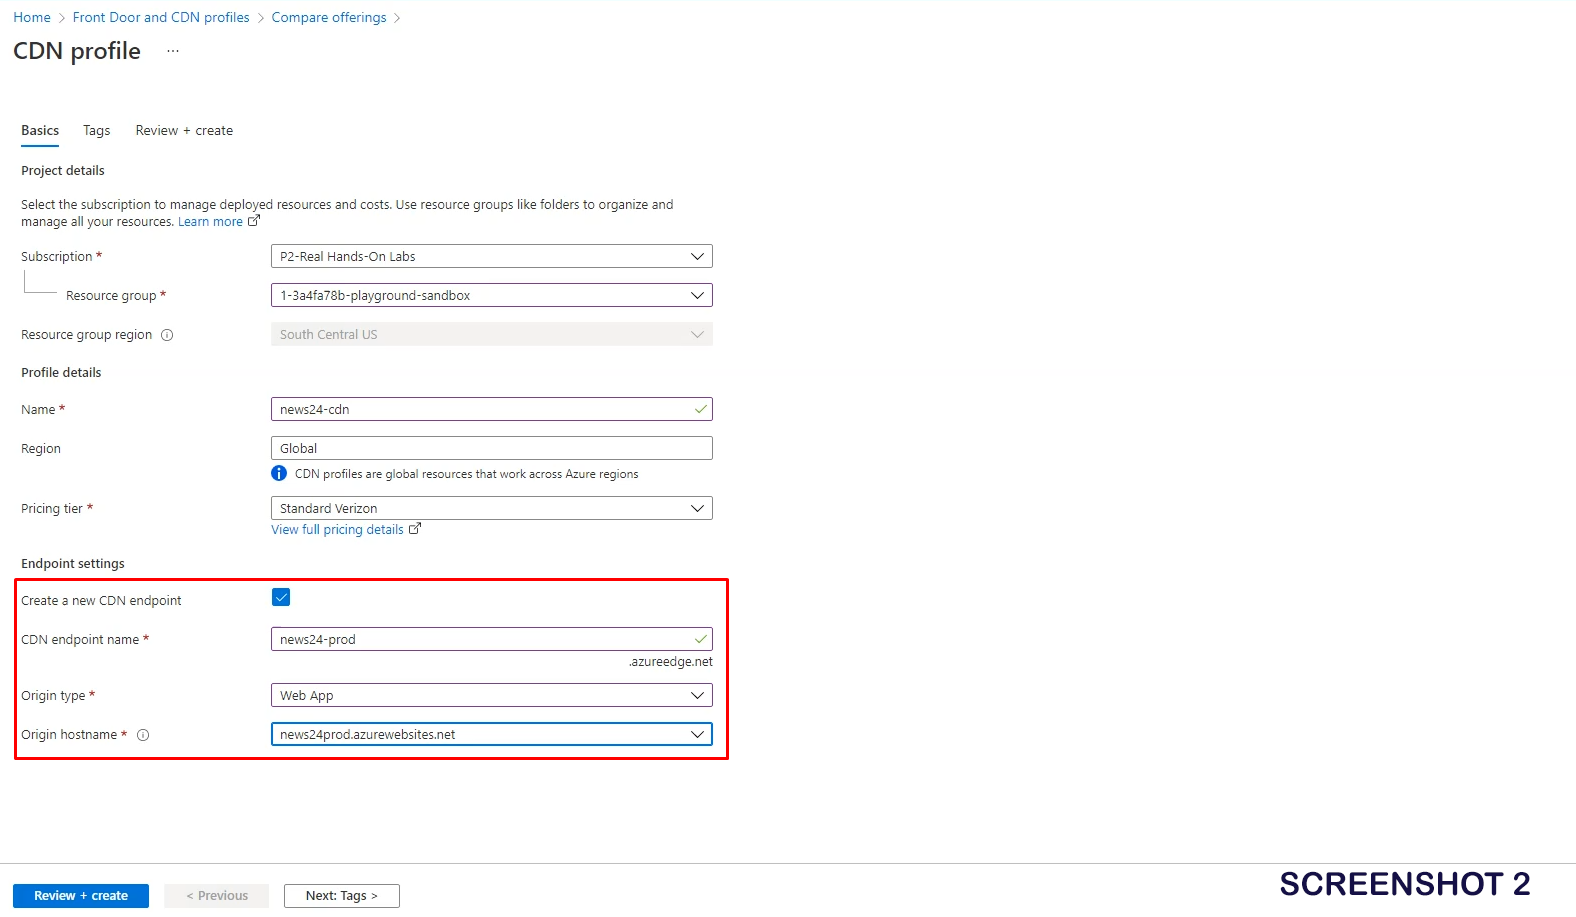
- Fill in the necessary information:
- Resource Group: specify the one we have used until now.
- Name: this will be the name of the CDN profile.
- Pricing tier: there are multiple options – we will choose Standard Verizon
4. We can create a CDN endpoint now – or create one later – we will simplify the process by creating it now. Select “Create a new CDN endpoint” which will show additional options:
- CDN endpoint name: the name of the endpoint which your website will be accessible by (don’t worry we will configure a custom domain :D)
- Origin type: Web App – since our website is hosted on App Service
- Origin hostname: the hostname/URL of the Web App created above
5. Finish the process by using Review + Create -> Create
Configure a Custom Domain - Azure CDN
After we have configured our website to sit behind a CDN, the next step will be to use a custom domain that we own so that users visit your website using that domain instead of using <name>.azureedge.net
Follow the steps to configure a custom domain:
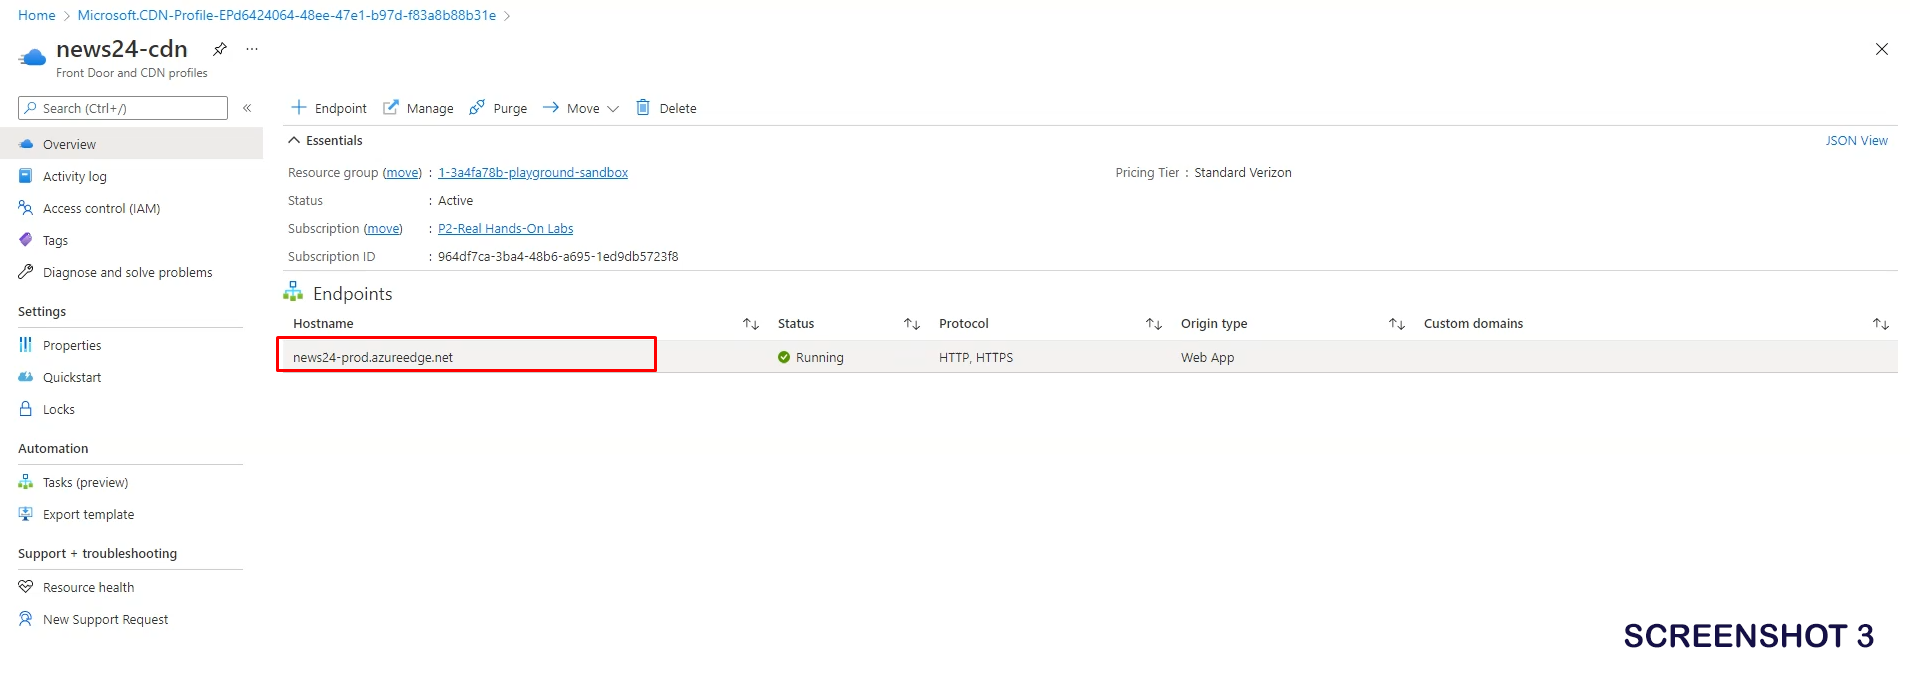
- After creating the CDN profile and a CDN endpoint, navigate to the CDN endpoint itself
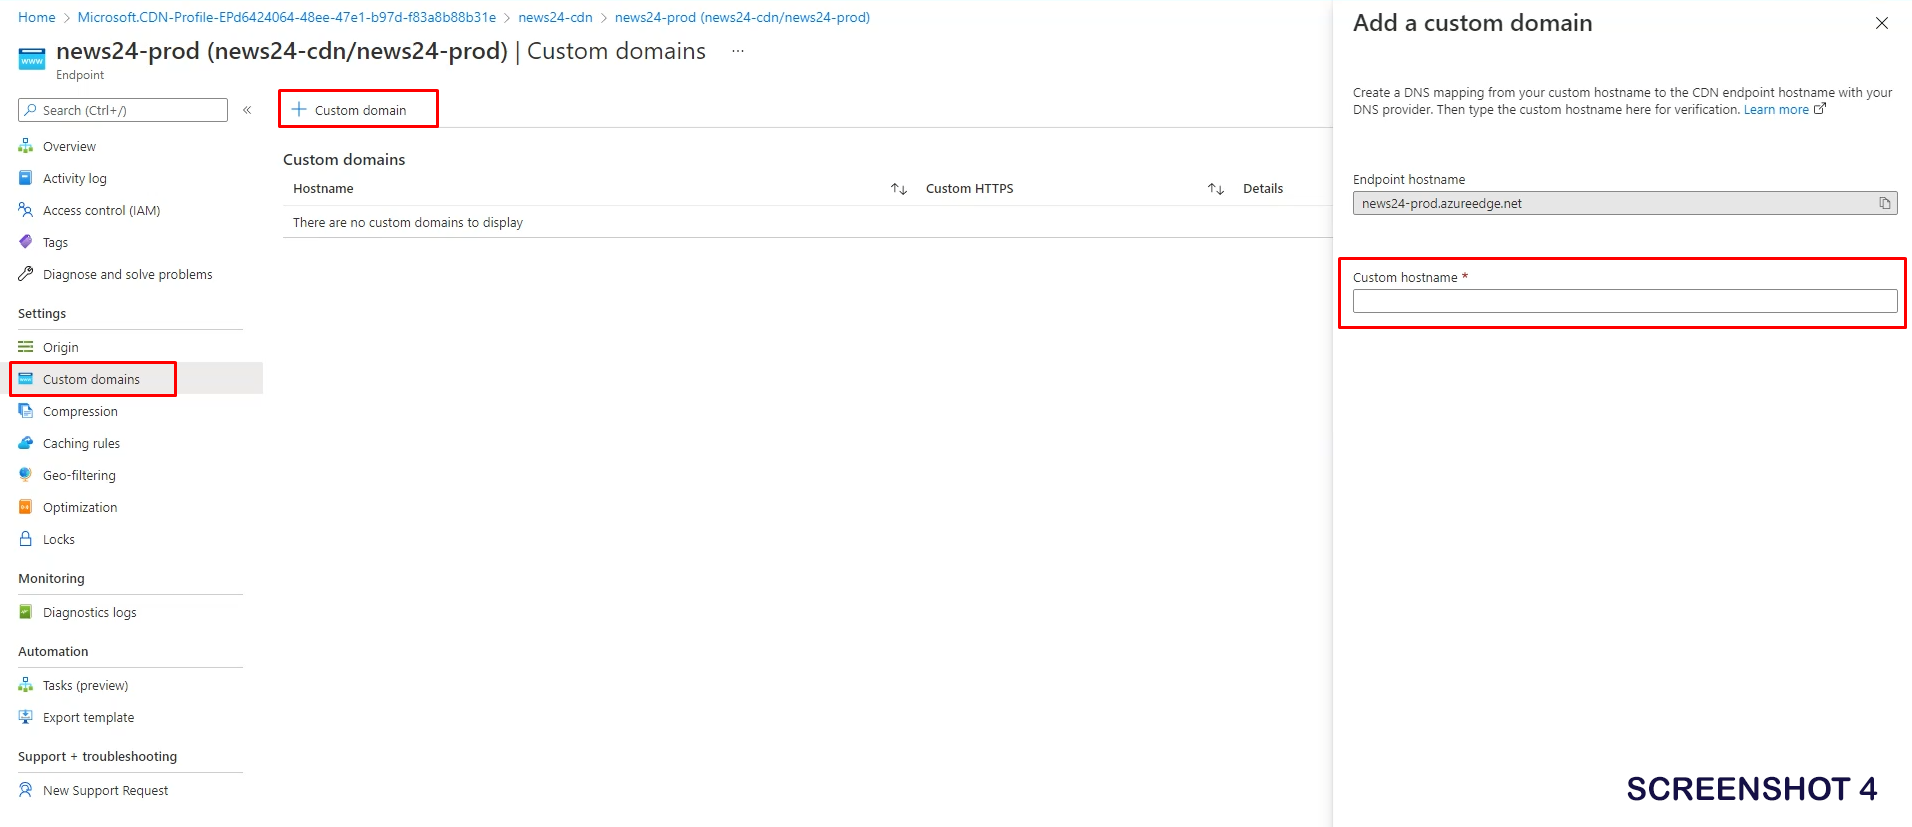
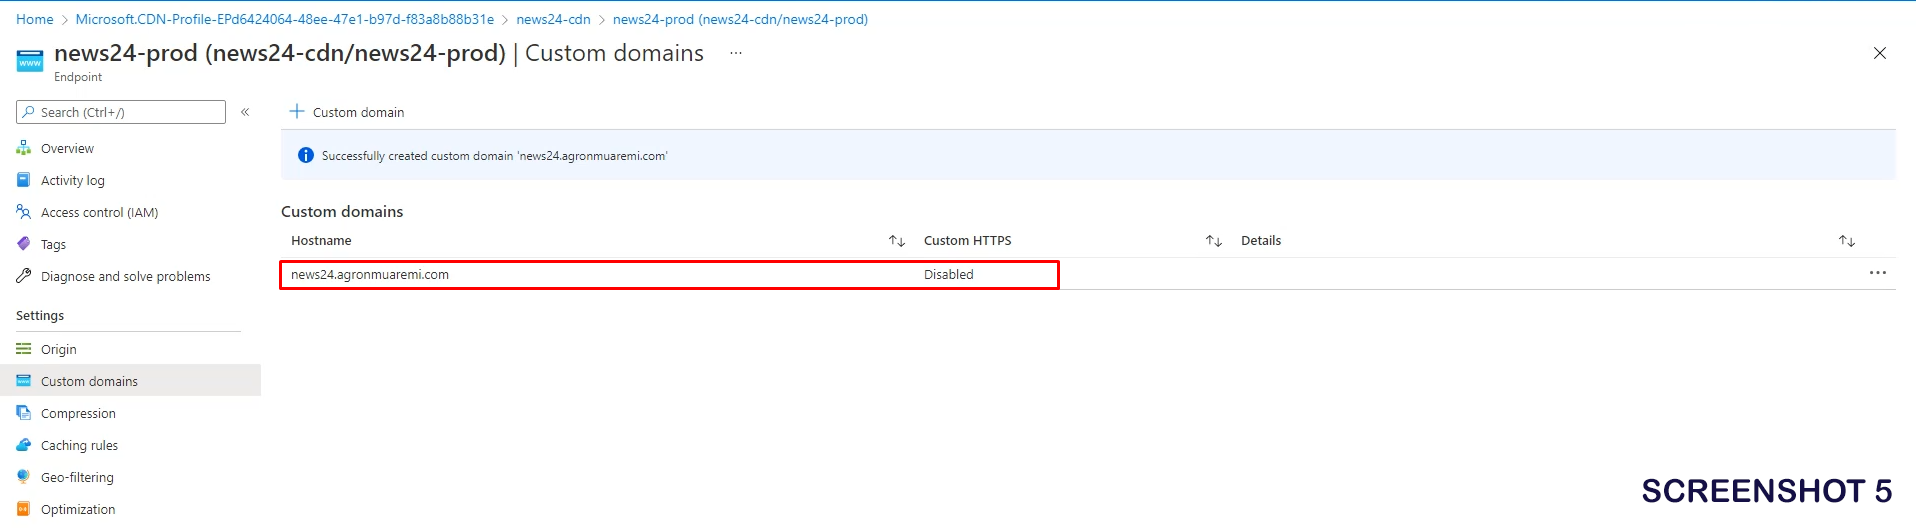
- Under Settings , choose Custom domains
- In order to use a custom domain , you will have to prove that you own the domain by creating a CNAME record that will point to your endpoint hostname (search online on how you can do it since it depends on your hosting provider)
- After a while, click on Add
- You have successfully added a custom domain to your CDN endpoint and you can access your website by using the custom domain instead of *.azureedge.net We wouldn’t want our visitors to get “This webpage is insecure” popups, that’s why we are going to add an SSL certificate to our domain. There are multiple ways this can be done – you can use a CDN managed certificate (this one is provided for free by Microsoft) or you can import a custom SSL certificate that you own. We will be using the CDN managed option. Follow the steps to add a CDN managed SSL certificate for our custom domain:
- Click on the custom domain you just added
- You will be redirected to a configuration page where you should turn on “Enable Custom domain HTTPS” option
- Select “CDN managed”
- Save the changes.

Is it enough? - Enabling monitoring using DataDog
- What if your website crashes and doesn’t perform as it should?
- What if visitors are getting Server Errors when visiting your site?
For this reason , we are going to set-up monitoring using DataDog. It will allow us to check for patterns and also create alerts if something is not working as expected.
There are four steps to follow when integrating DataDog with Azure:
- Create an identity for DataDog so it can authenticate and use Azure resources.
- Create an event hub so that we can collect logs from different Azure resources
- Create a function app so that we can forward the logs to DataDog servers.
- Configure Diagnostic Settings so that logs can be collected to the event hub.
Creating a Service Principal for authorization
To allow DataDog to authenticate and use Azure resources, we will create a Service Principal – which is basically a combination of username/password for an application.
Follow the steps to create a Service Principal:
- We are going to use Azure CLI (you can also use Azure Portal to create the Service Principal).
- Enter az login to authenticate to Azure
- Use the following command to create the Service Principal and assign a monitoring reader role to the specified subscription: az ad sp create-for-rbac –name <service-principal-name> –role “Monitoring Reader” –scopes /subscriptions/<subscription-id>
- You will be displayed an output containing useful information such as appID and Password – we are going to use them to integrate DataDog with Azure
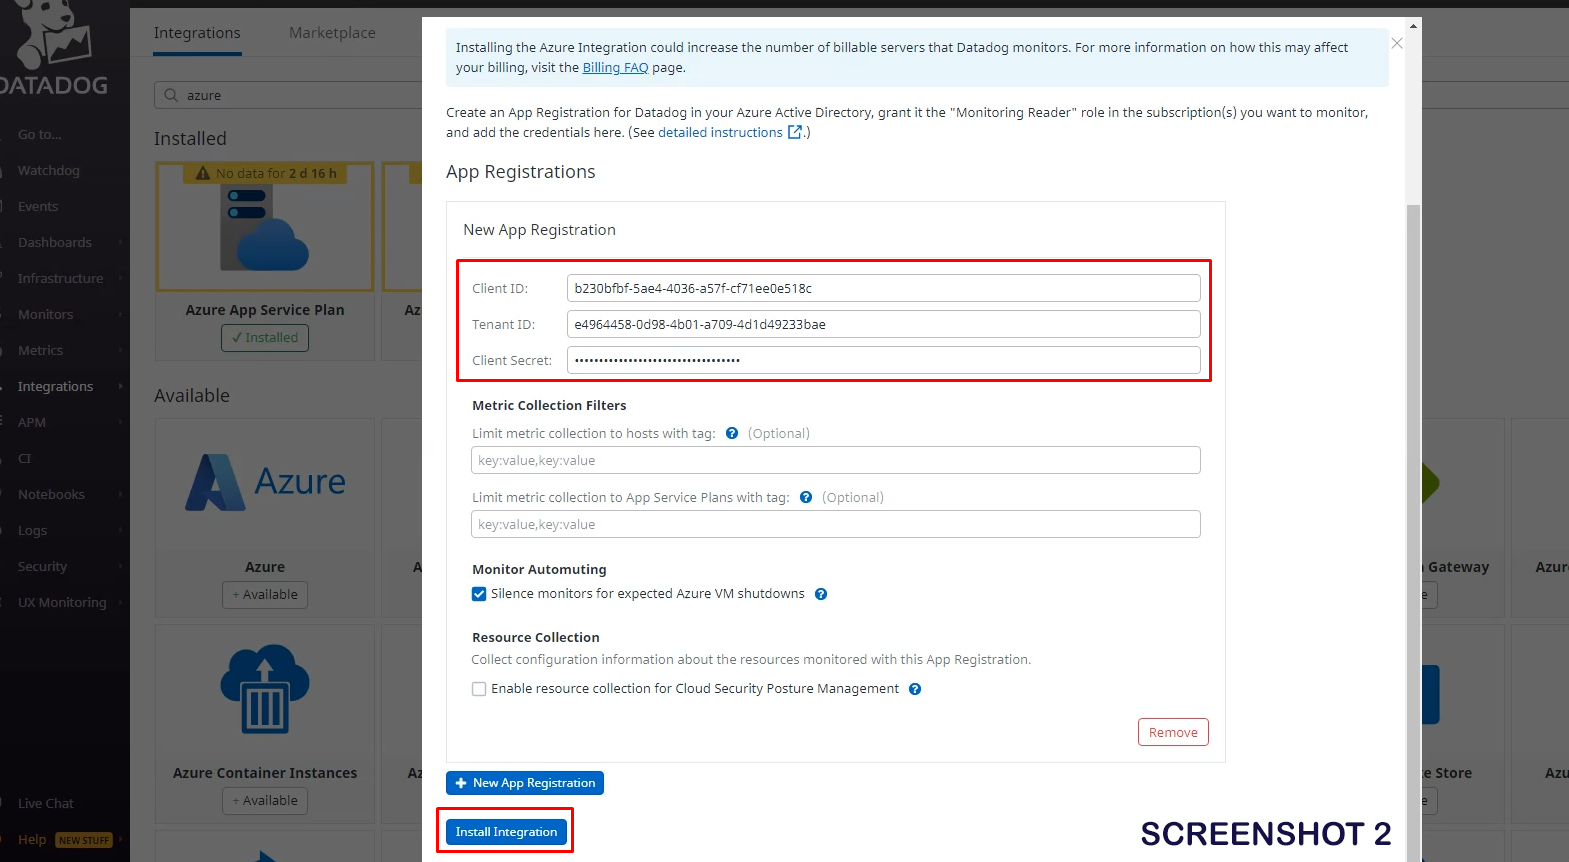
- On the DataDog console (website) , navigate to Integrations and choose Azure -> Install
- Specify the following settings under New App Registration:
- Client ID: specify the appID from the output above
- Tenant ID: specify the Subscription ID
- Client Secret: specify the password from the output above
7. Click on Install Integration
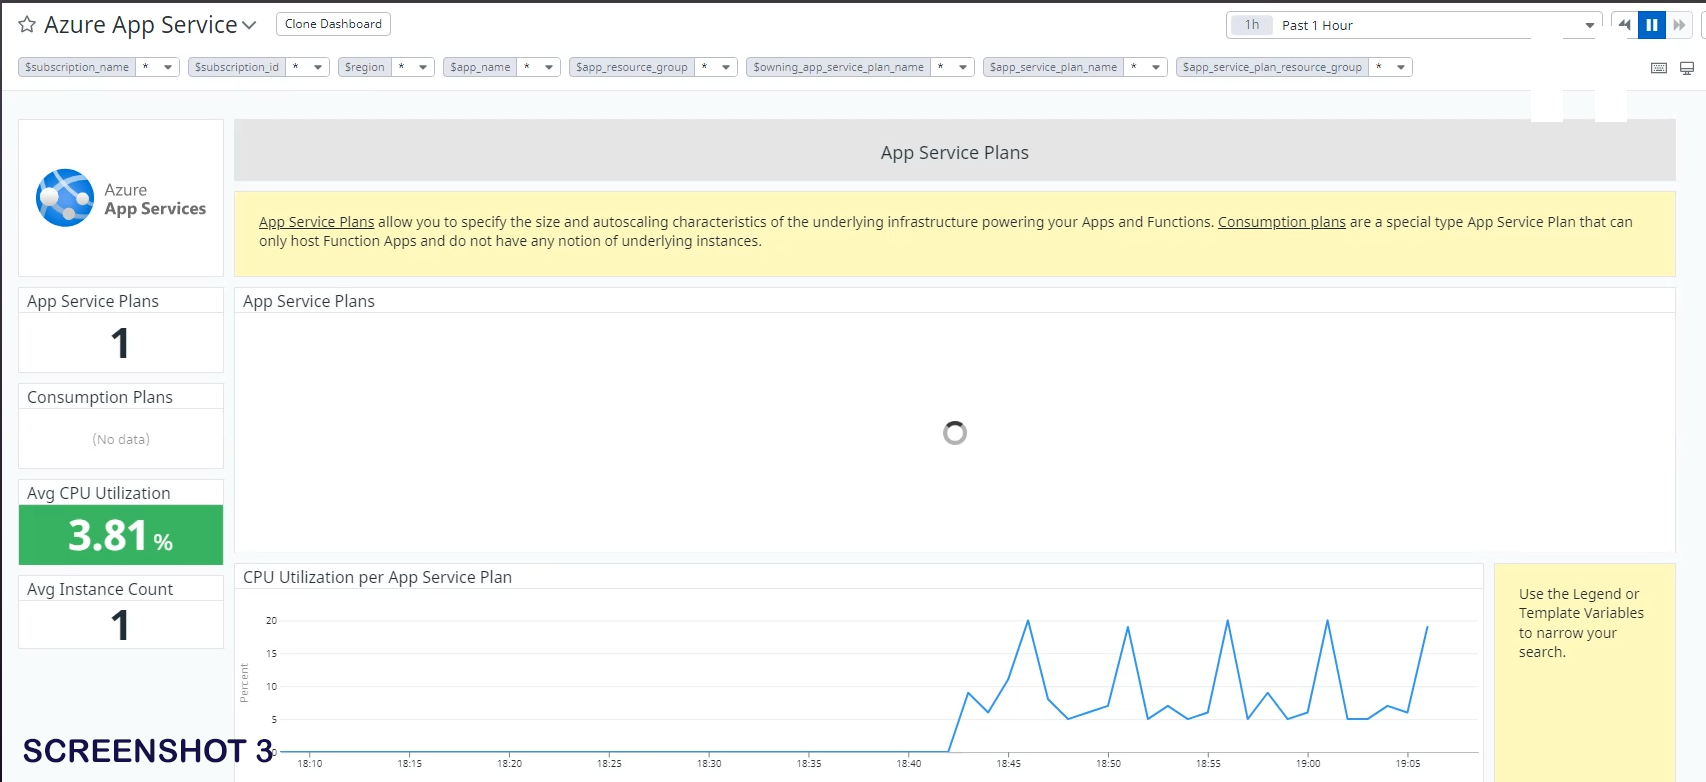
8. After a while we will start getting metrics from Azure resources.

Creating an Event Hub
While we receive metrics from Azure using the above configuration, there is not a straightforward way to receive logs (ex. Activity logs) from Azure. To solve this problem we will have to collect the logs to an Event Hub and then forward them to the DataDog servers.
To create an event hub, first of all we will need to create an Event Hub Namespace – which is just a container for different event hubs.
Follow the steps to create an Event Hubs namespace:
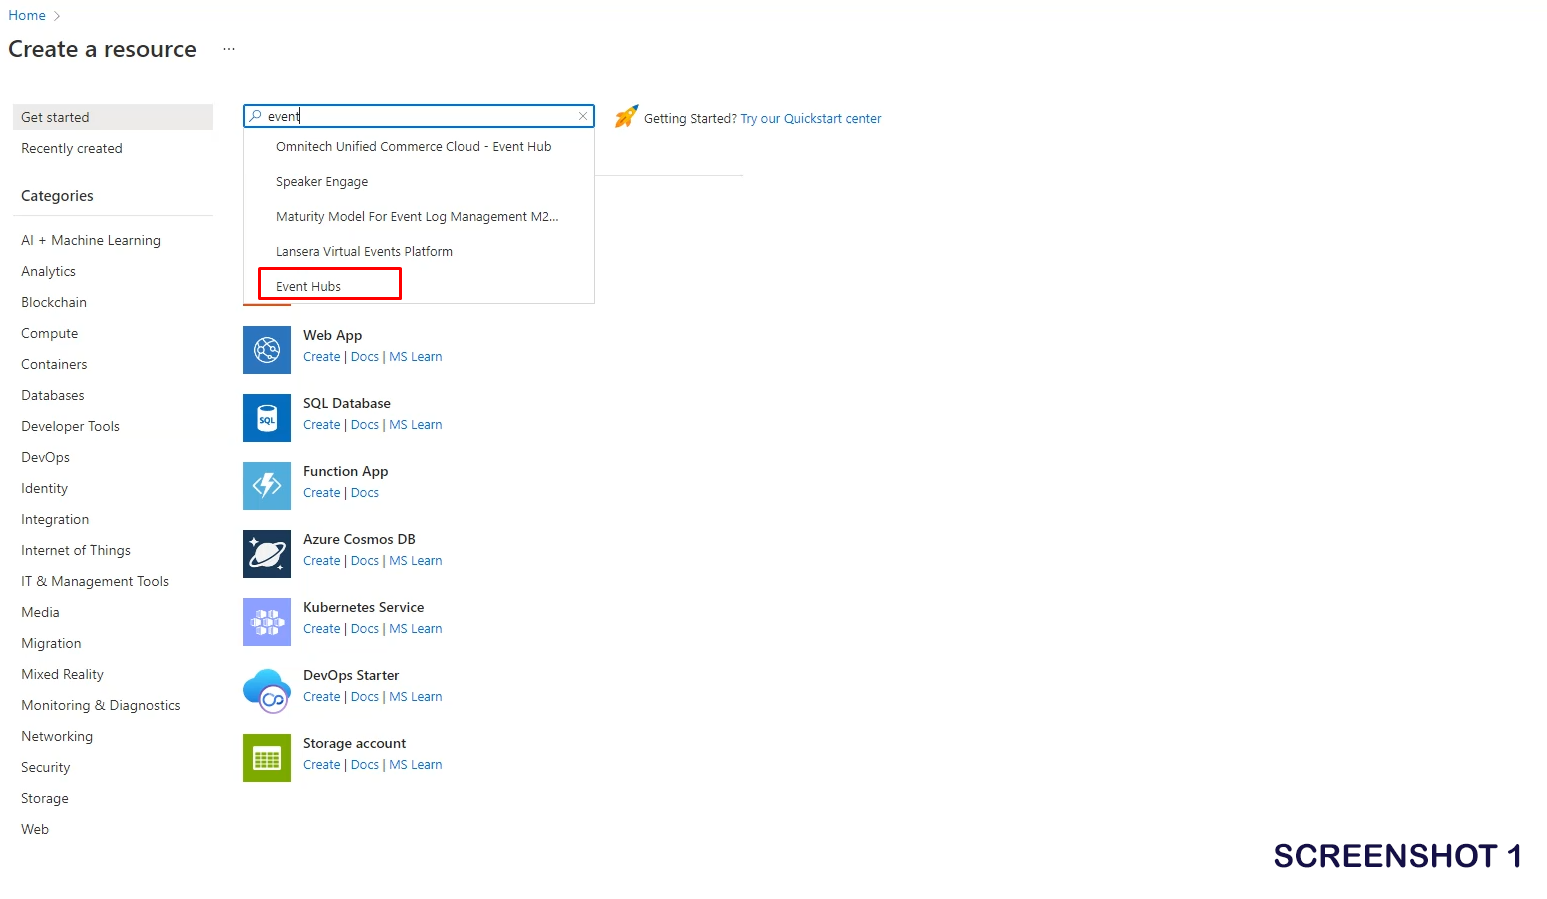
- Choose the Create a resource option displayed on the landing page
- Search for Event Hubs and click Create
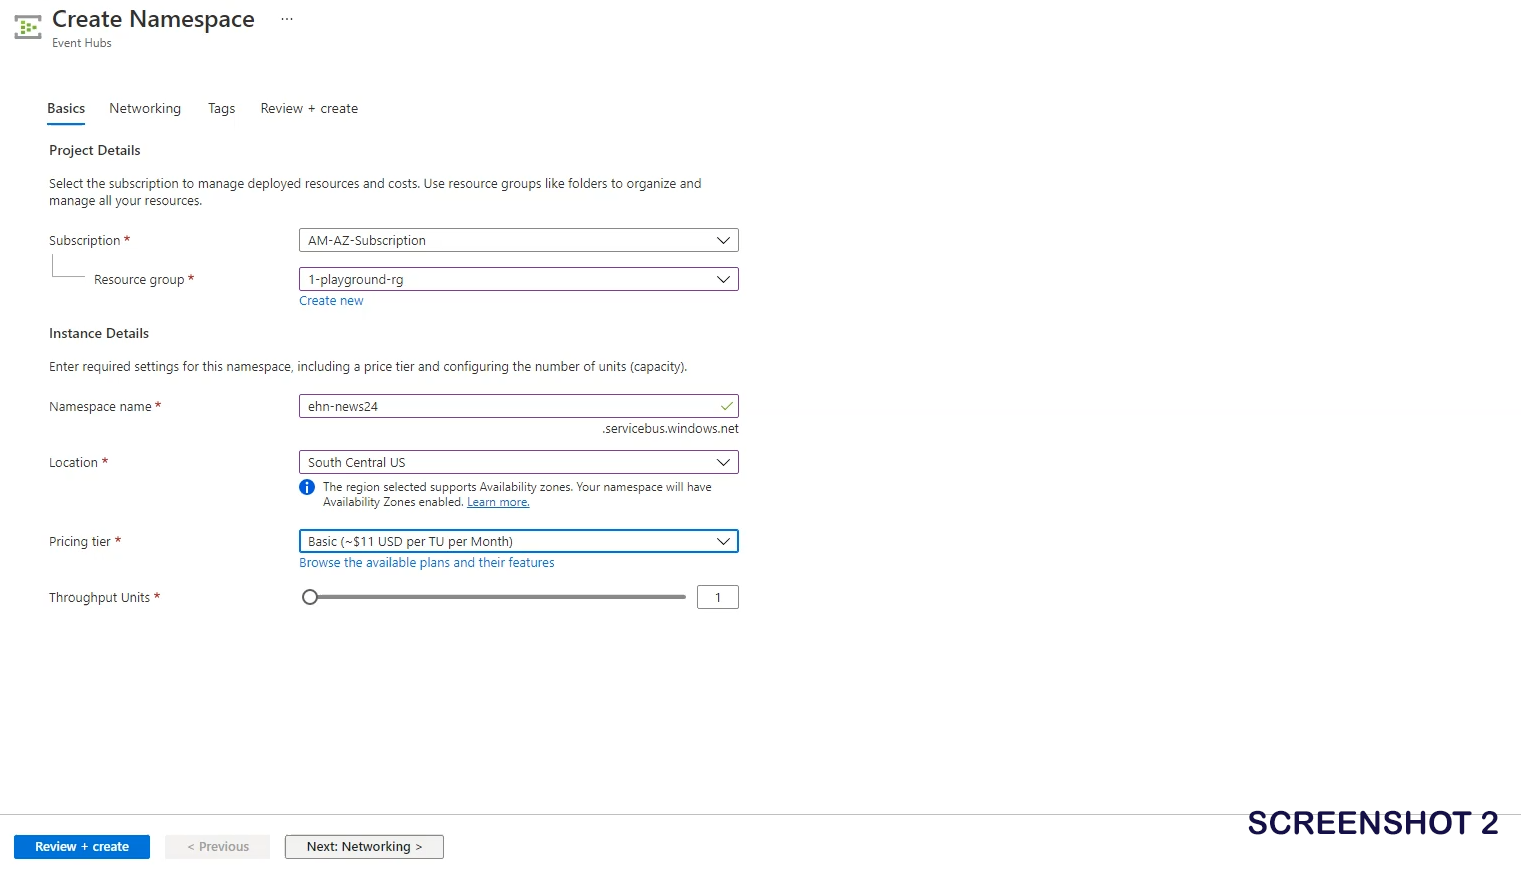
- Fill in the necessary information:
- Resource group: choose the resource group we have been using till now.
- Namespace name: the name of the namespace (container) that will hold the event hub entities
- Location: choose the same location as other resources
- Pricing tier: select the preferred SKU
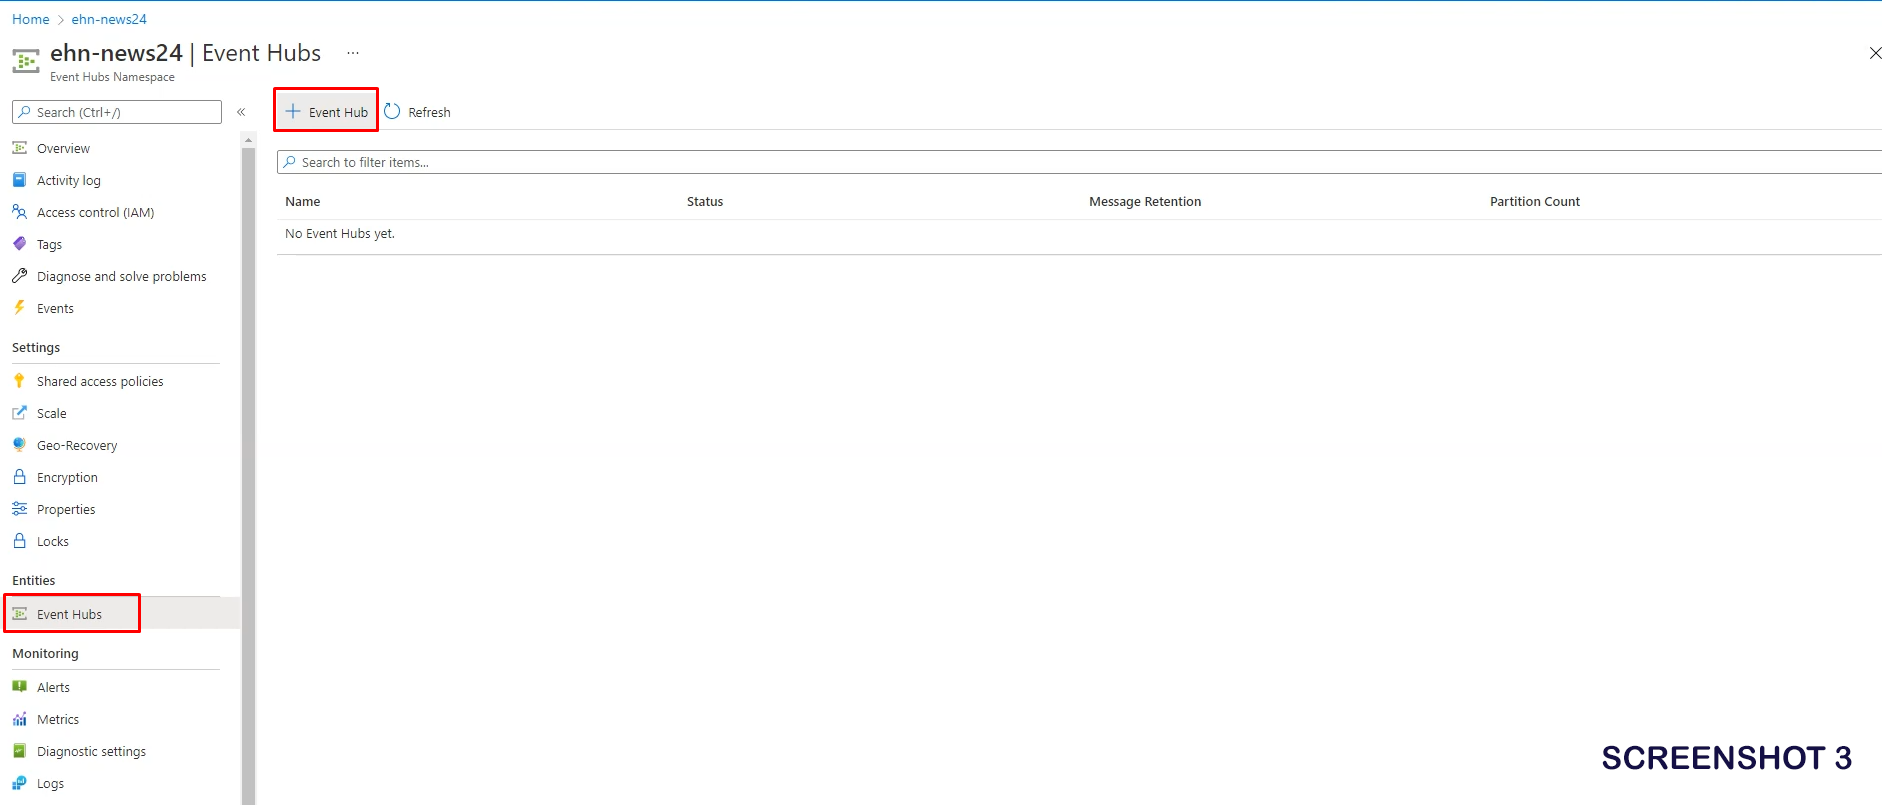
Now that we have created an Event Hub namespace , we will go and create the event hub entity itself:
Follow the steps to create an Event Hub entity inside a namespace:
- Navigate to the Event Hub namespace you just created.
- Under Entities choose Event Hubs.
- Click on +Event Hub to create an Event Hub entity.
- Enter a name and click on create

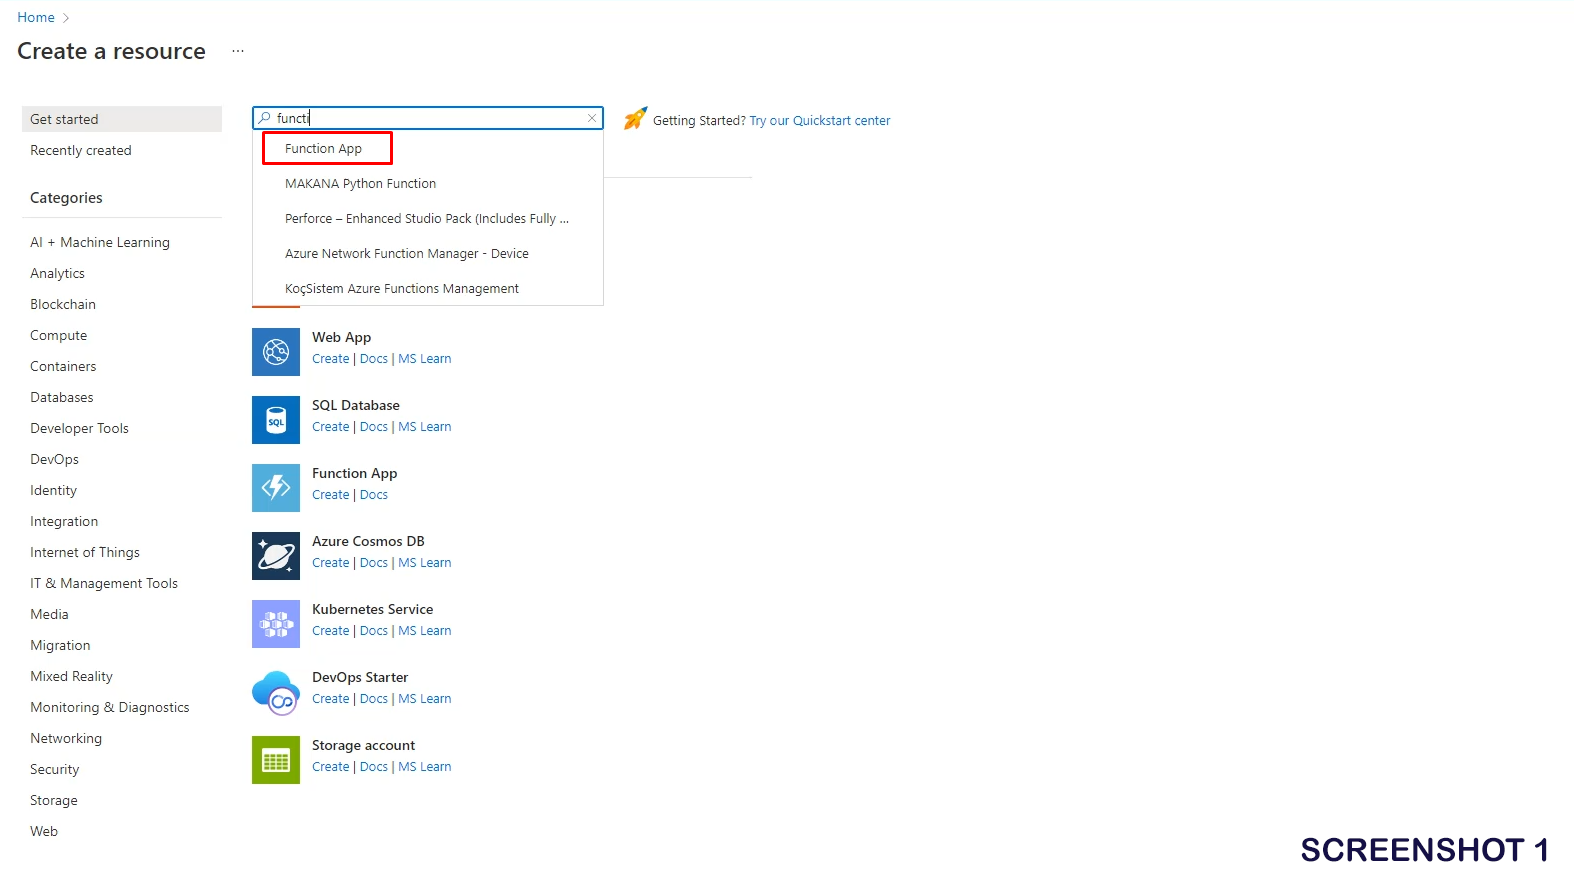
Creating a Function App
- Choose the Create a resource option displayed on the landing page.
- Search for Function App and click Create.
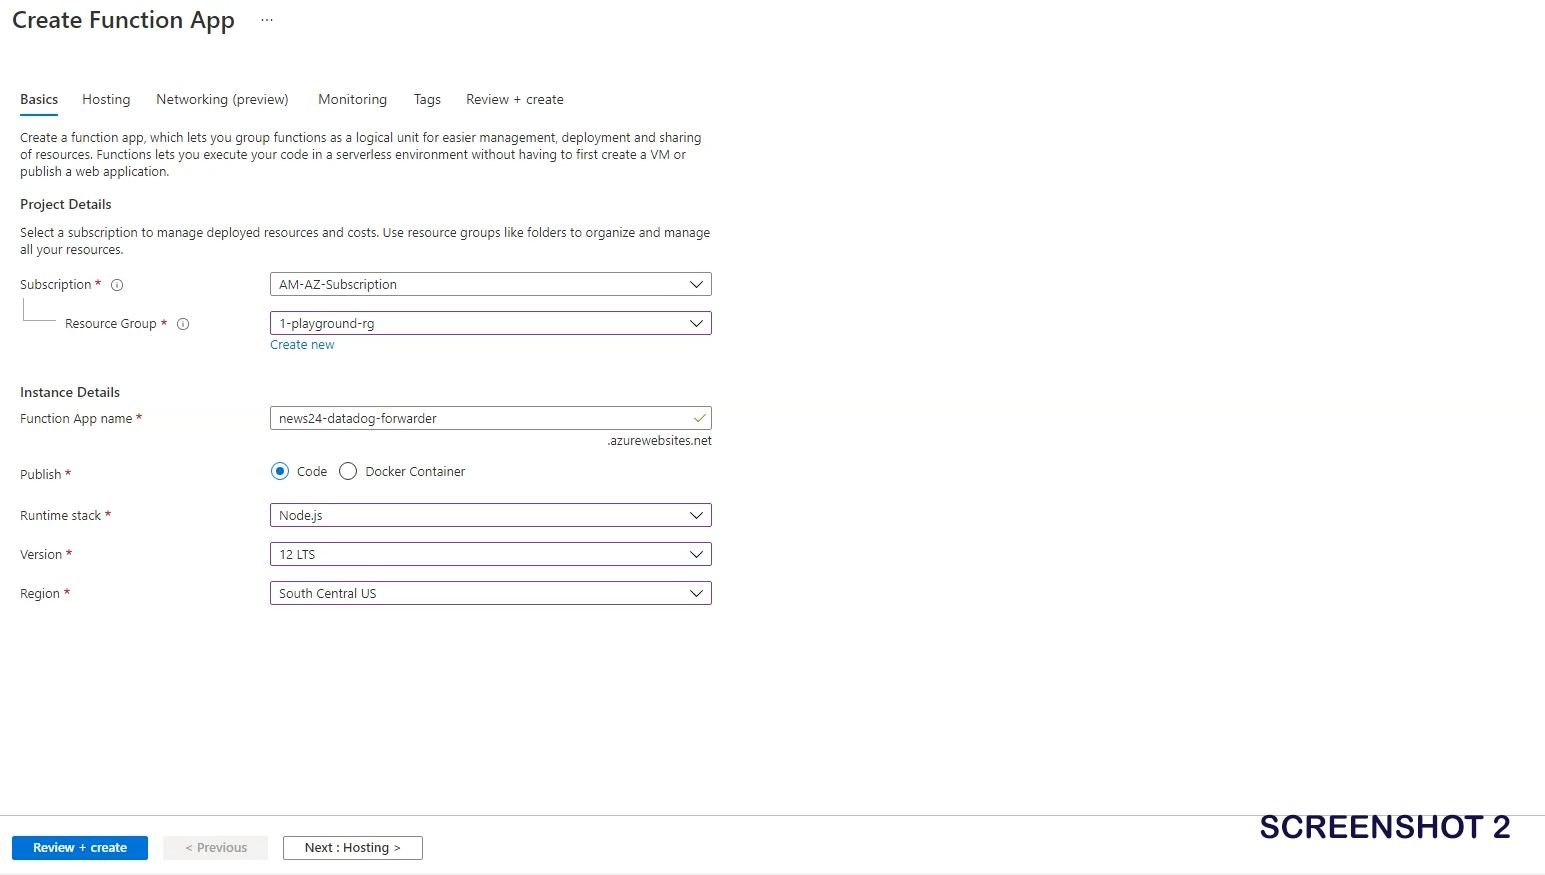
- Fill in the necessary information:
-
- Function App name: the name of the function app
- Publish: Choose Code (these settings are specified by DataDog – see their documentation)
- Runtime stack: Node.js
- Version: 12 LTS
- Region: same region as other resources
- Accept the other settings as default.
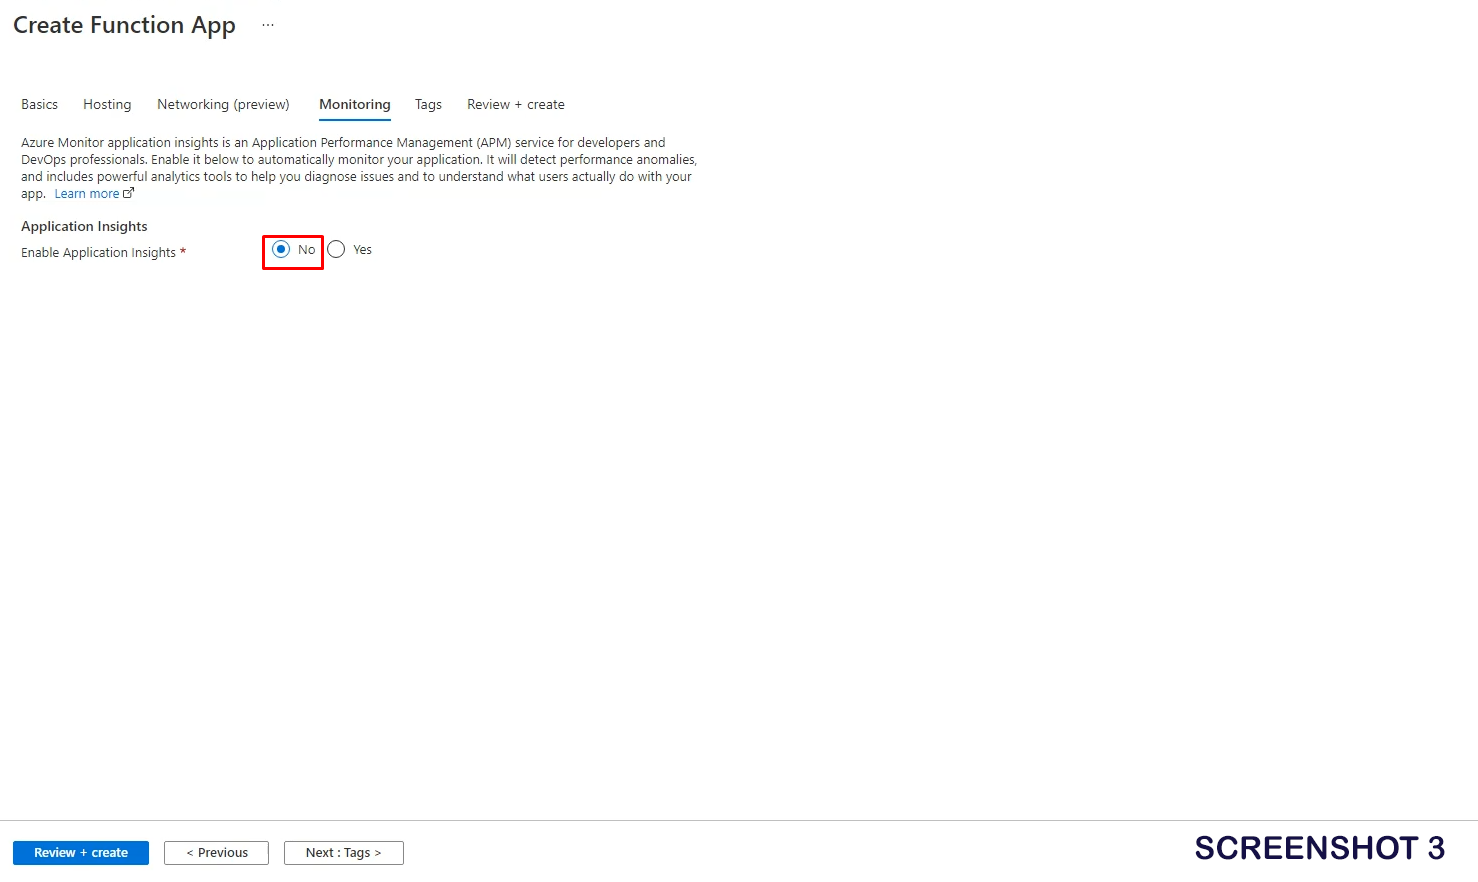
- Under Monitoring tab , make sure to disable Application Insights
- Finish the deployment by choosing Review+Create -> Create
- Navigate to the function app you just created
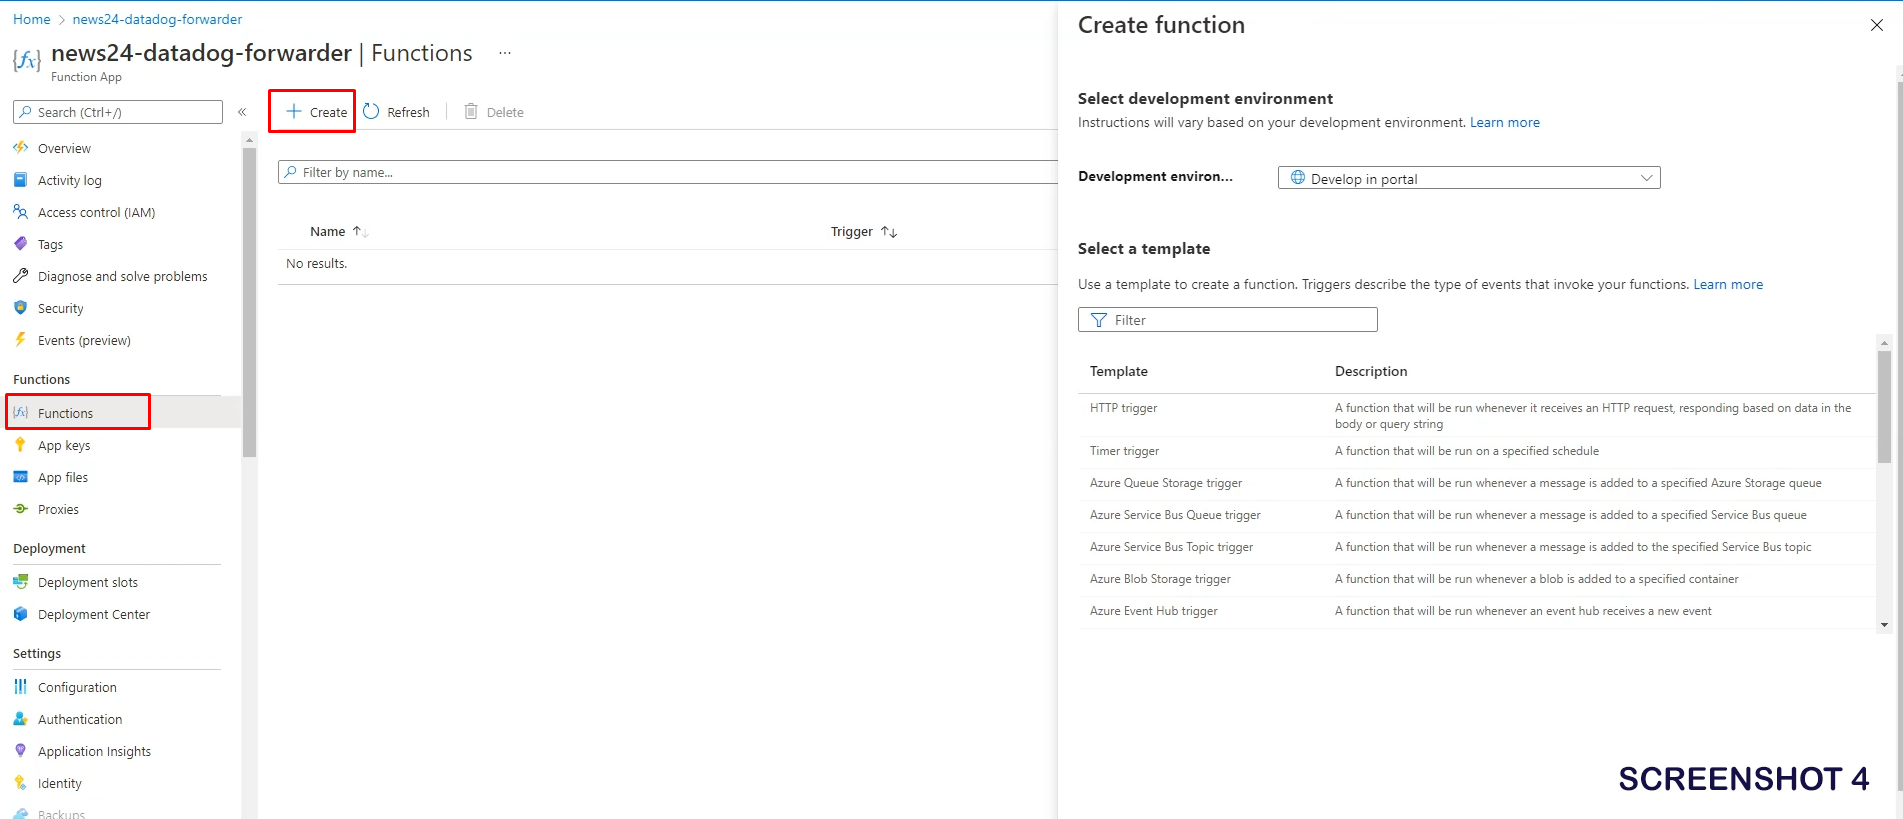
- Under Functions choose Functions
- Click on Create to create a new function
- Fill in the necessary information:
-
- Development environment: Develop in portal
- Select a template: this one specifies the function’s trigger – choose Azure Event Hub trigger
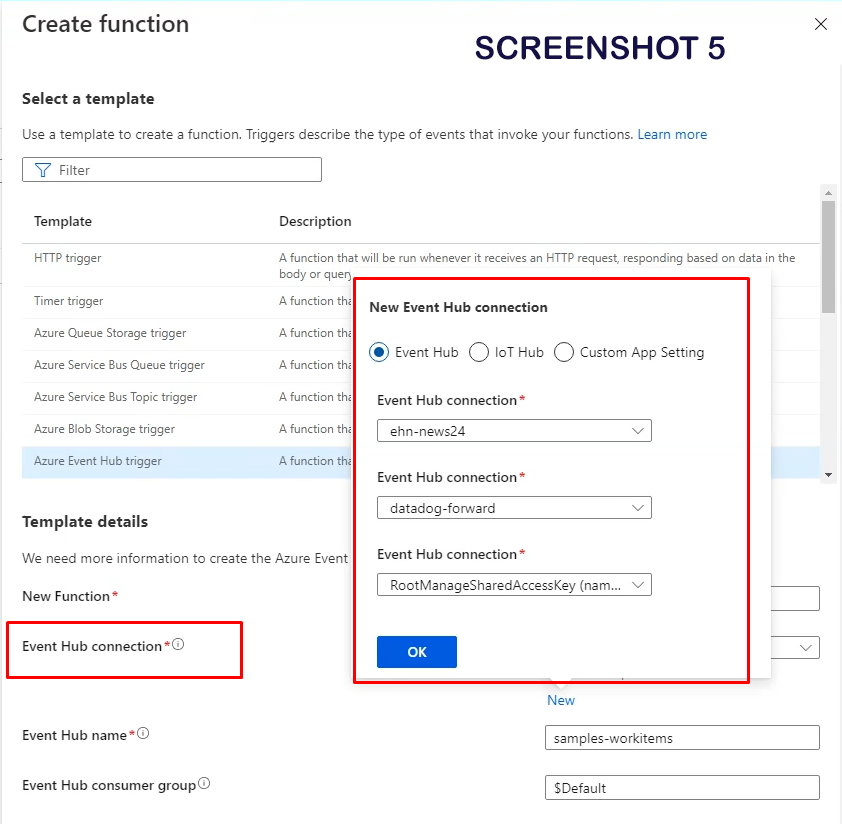
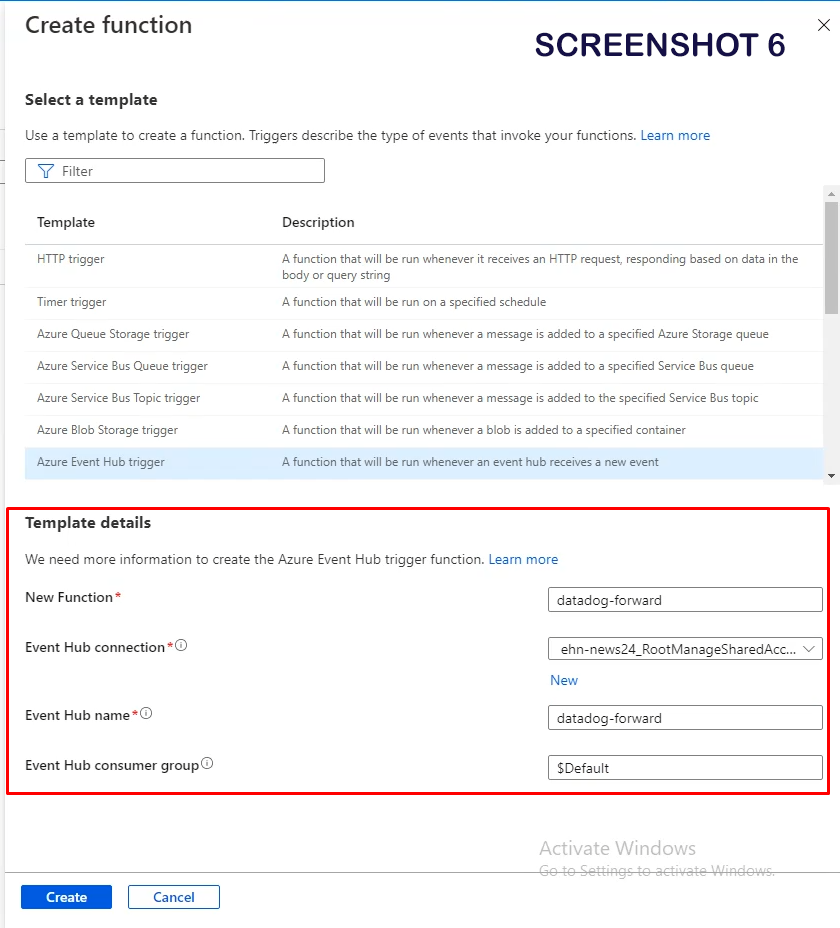
- New Function: enter the name of the function – ex. Datadog-function
- Event Hub connection: click on New to create a connection with event hub, choose the Event Hub namespace and the Event Hub entity we created above and click OK.
- Event Hub name: enter the name of the Event Hub entity
- Click on Create to create the function.
Add the code to the function
The last step in configuring the function is to add the code itself to the function:
Follow the steps to add the code to the function:
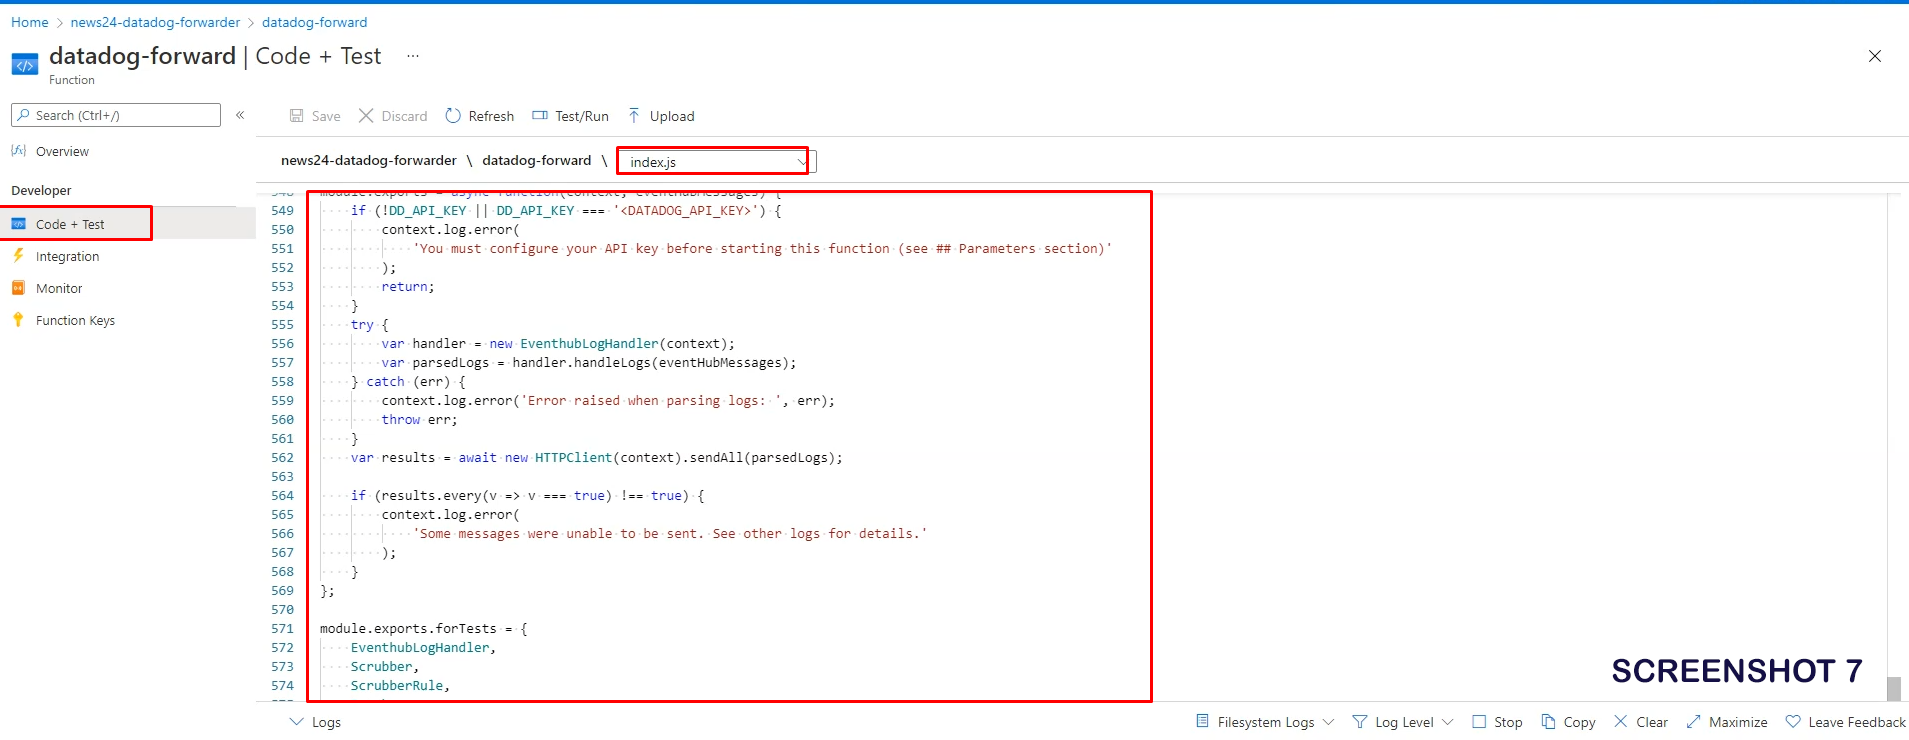
- Navigate to the function you just created (note: you can have multiple functions inside a function app)
- Under Developer choose Code+Test
- In the index.js file – copy and paste the following code published by DataDog (https://github.com/DataDog/datadog-serverless-functions/blob/master/azure/activity_logs_monitoring/index.js)
- Click on Save
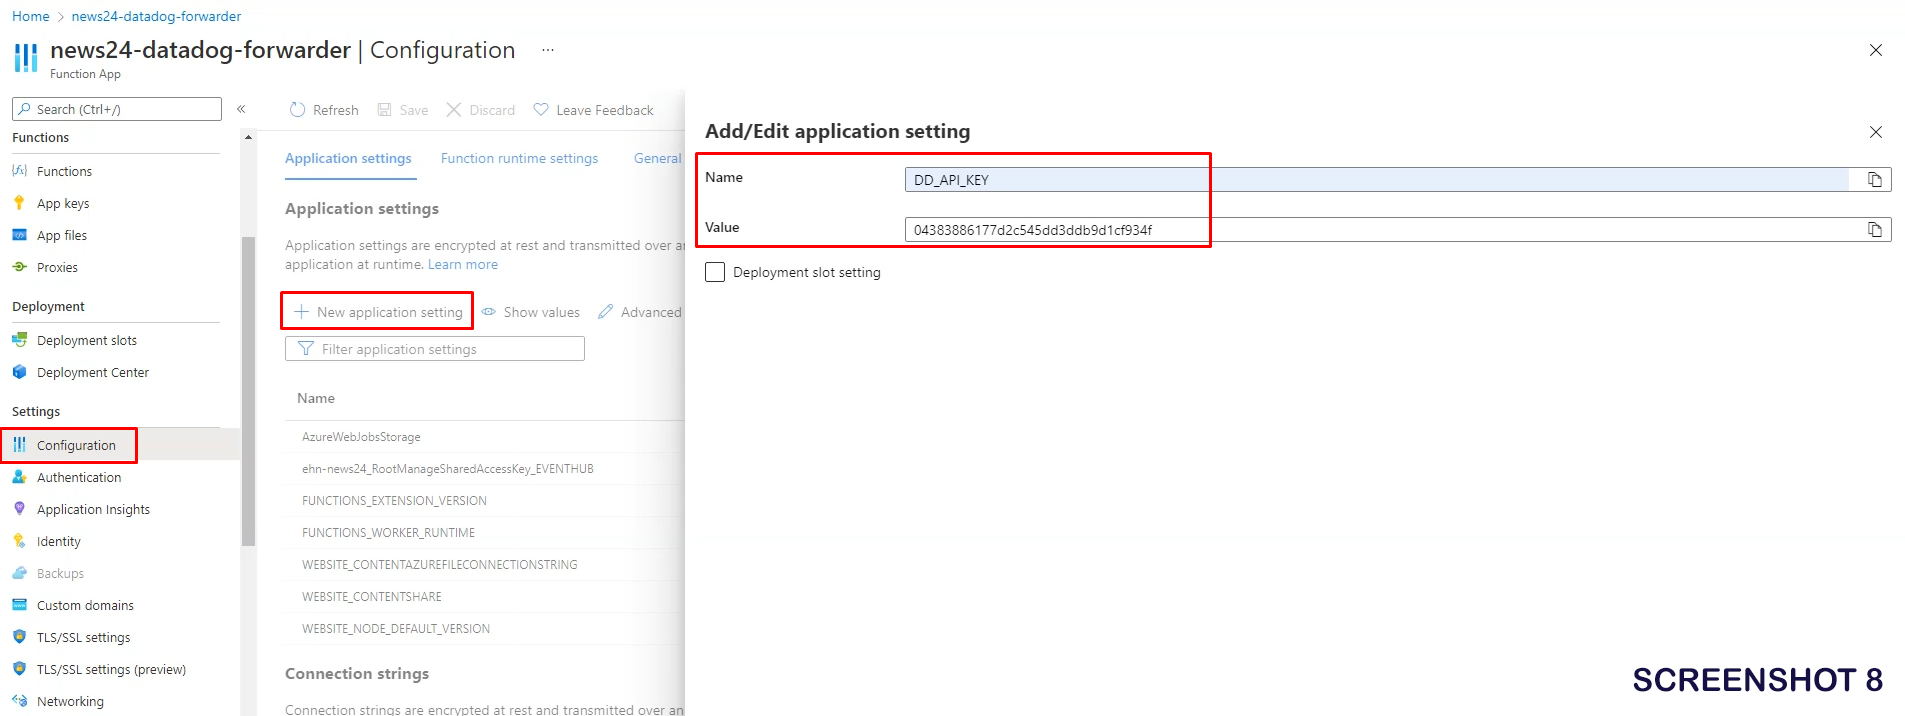
- Go back to the Function App, under Settings choose Configuration
- Add a New Application settings:
- Name: DD_API_KEY
- Value: The API key which you can get from the DataDog console under User->Organization Settings-API Keys
Configuring Diagnostic Settings
To collect the logs to the event hub, we need to setup Diagnostic Settings on the resource.
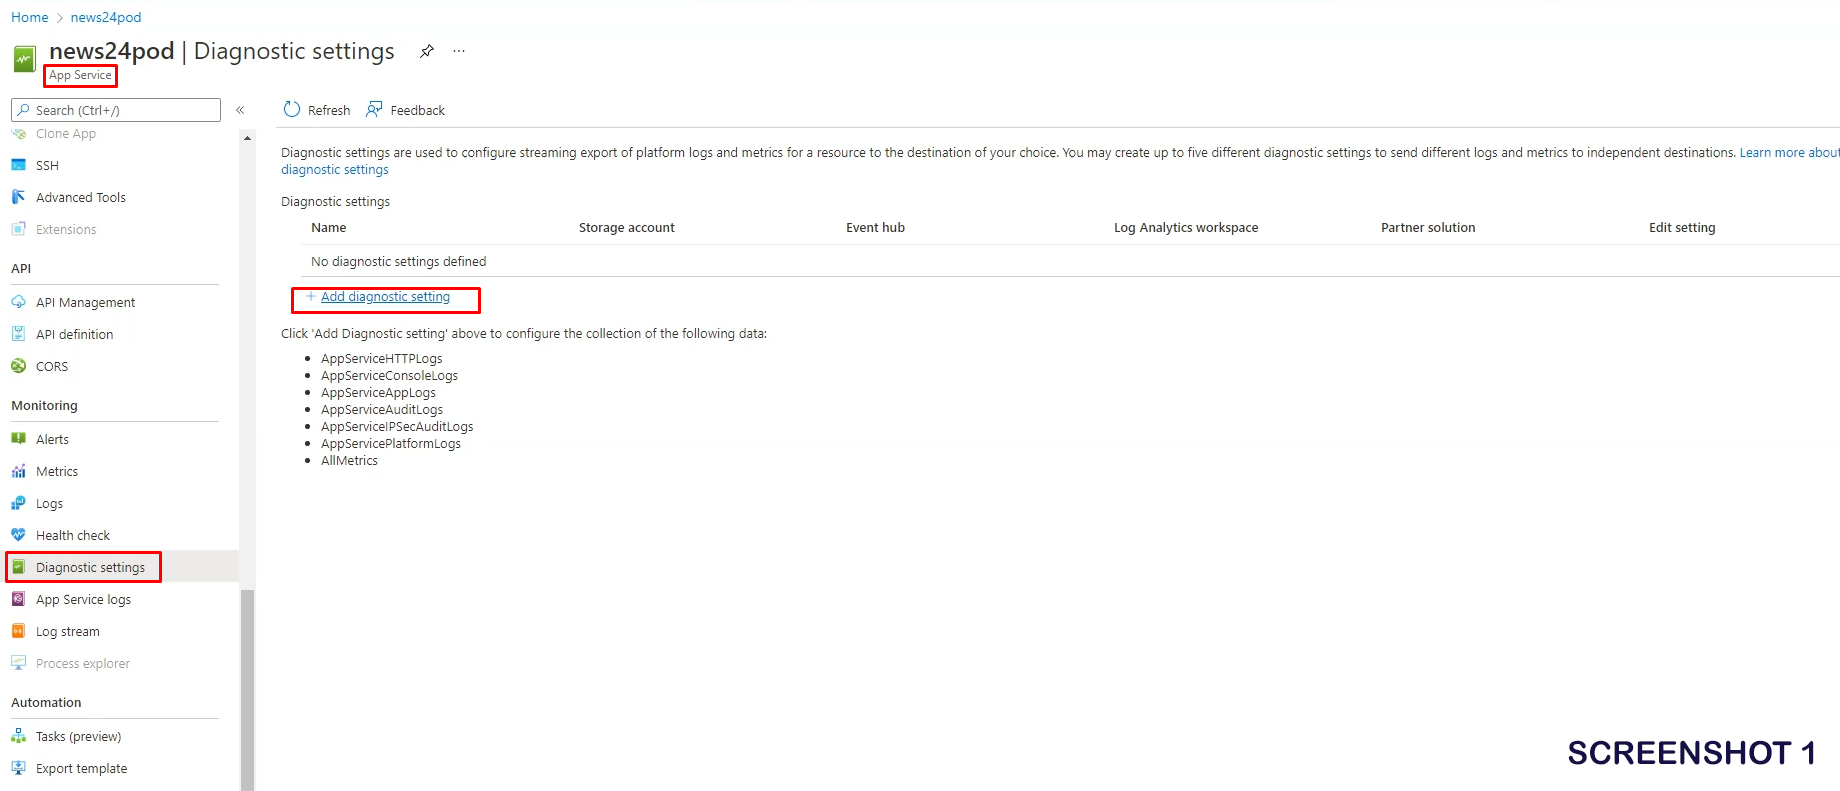
Follow the steps to enable Diagnostic Settings on the Web App:
- Navigate to the Web App
- Under Monitoring choose Diagnostic Settings
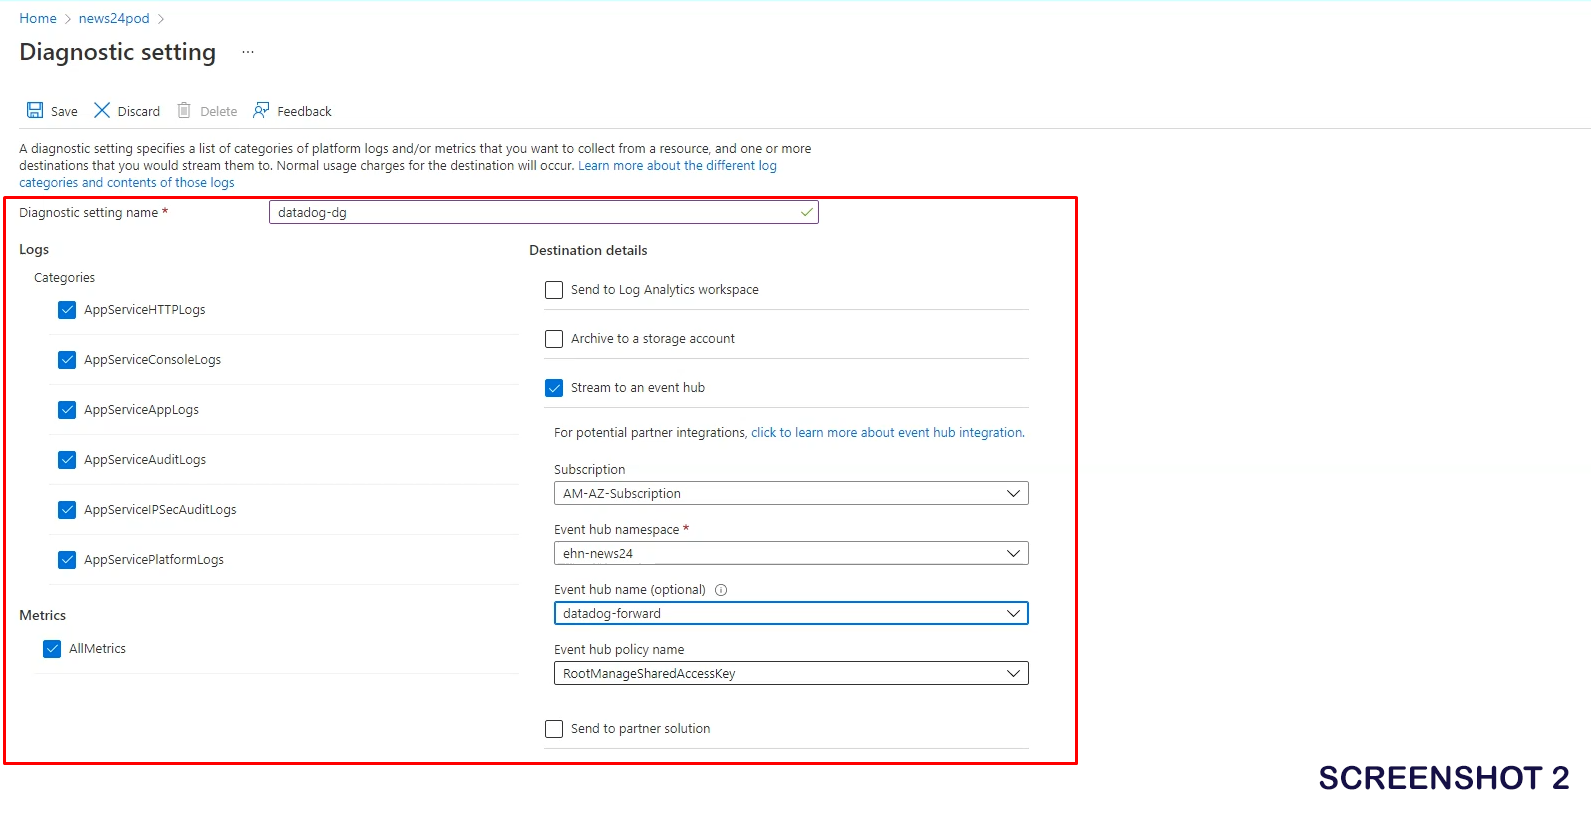
- Fill in the necessary information:
- Diagnostic setting name: enter a name for the setting – ex. datadog-diagnostic
- Logs: select the log category you want to forward to the event hub
- Metrics: select if you want to forward metrics
- Destination details: Choose “Stream to an event hub” option and select the event hub we have created
- Click Save
The END
It has been a long post 😀
Let’s recap what we have done:
- We started by having a look and anylizing the High Level Architecture Diagram and how components communicate with each other
- We created a resource group that acts as a container to group resources together
- We deployed Azure Database for MySQL instance, configured firewall rules to allow us and other Azure resources to communicate with the instance and we created a blank database inside called wordpress so it can be populated later during WordPress installation.
- We deployed a Web App hosted on App Services, it uses a docker container running WordPress and configured its settings so that it knows where the database is located and how to connect to it.
- We installed WordPress itself.
- We didn’t stop there, instead we went a step deeper into implementing a CDN and adding a custom domain as well as an SSL certificate to it.
- We waited a lot of time for the CDN changes to take effect 😀 – just kidding, while the changes took effect – we went ahead and implemented monitoring by creating a Service Principal, creating an Event Hub and creating a Function inside a Function App.
- In the end we configured the Diagnostic Settings for the Web App so that we sent every bit of information (logs) to DataDog for monitoring and alerting.